
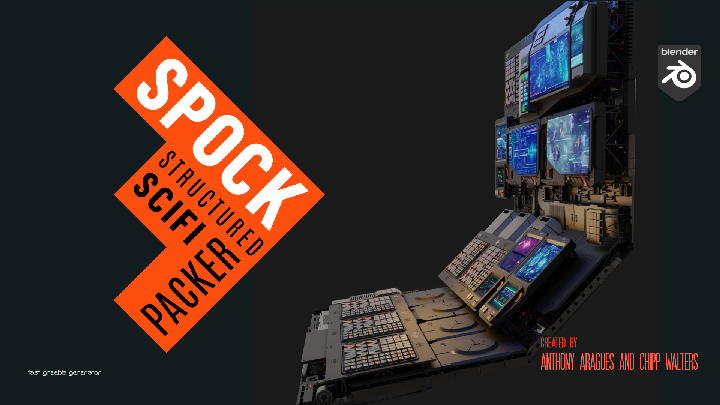
SPOCK Structured SCIFI Packer
By Anthony Aragues and Chipp Walters
Parts copyright ©2023
What is SPOCK?
INSTALLATION
How to Install DPACKS
So, how is SPOCK different from FLEX and SYNTH?
Understanding DPACKS and creating your own
Creating your own DPACKS
How to Use
Typical Workflow
Panel Legend: What are all these buttons and controls for?
Typical workflow use
All controls and functions expanded
Preferences
Using existing DPACKS with SPOCK
Tips and Tricks
Troubleshooting
Help
Known limitations
Not all faces being propagated by SPOCK
No propagation happening
NOTE: this addon has a longer than usual install on registering the first time as it has to download some packing libraries.
What is SPOCK? {#what-is-spock?}
Structured Packing Object Creation Kit
SPOCK is a structured greeble packing and generation tool. It uses advanced algorithms to efficiently and eloquently pack different objects from distinct collections onto a face or selected faces. It is our top of the line tool for quickly generating amazing hyperdetailed props and scene elements. It is simple to use and very powerful– and all at the same time. Incredible detail can be created with the click of a button as shown in this example.
INSTALLATION {#installation}
An Internet connection is required for the install. After that it works without being connected.
To install SPOCK, download the zip file and then install it as you would any other addon using the Preferences panel. Once installed, you may delete the zip file or store it some place for archival purposes. Be sure and turn on the addon by clicking the checkbox next to it. Please note that this addon has a longer than usual install on registering the first time as it has to download some packing libraries.
When updating the addon, it’s always a good idea to first uninstall via the preferences before installing a new version.
When the addon is first installed, it will check to see if you have SCIFI FLEX installed and automatically import the thumbnails for the FLEX DPACKS. It will also automatically allow the selection of the default SPOCK SCIFI DPACK. And, in the preferences section, you can also create any folder location where you want SPOCK to look for other DPACKS.
SPOCK comes with the SCIFI DPACK so you don’t need to install it.
If you have problems, please see http://cw1.me/trouble and http://cw1.me/helpyou
How to Install 3rd party DPACKS {#how-to-install-3rd-party-dpacks}
DPACKS, are .blend files with specifically prepared objects in collections ready to load and use with SPOCK.
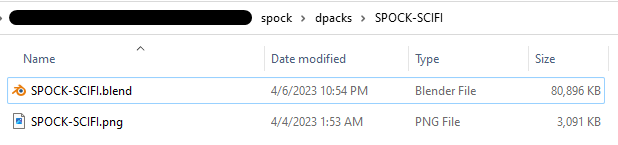
1. In the addon references there is a choice for a folder location. This is your master folder for all custom dpacks. ( I call my master folder “dpacks” ).
2. Under the master folder should be a separate folder for each dpack with the same name as the dpack. No zip files, just the uncompressed folder with a .blend and a .png inside with the same name as the dpack. For example:

3. You can also store DPACKS in the dpacks folder in the spock addon.
SPOCK KPACK
SPOCK also comes with a KPACK which is used with KIT OPS PRO or KIT OPS FREE. You may optionally install it just as you would any other KPACK (after unzipping it). In the KPACK are several materials, the hero element of SCIFI DPACK, a corridor cutter used in a corridor demo video, and some different materials.
So, how is SPOCK different from FLEX and SYNTH? {#so,-how-is-spock-different-from-flex-and-synth?}
Good question.
The quick version is:
Flex only uses geometry nodes which cannot do regular packing, so anything that is packed in anything resembling a grid is not possible. Geometry nodes also does not do edge to edge packing and it extends outside the boundaries of faces.
Flex only places things in a random position, which is fine for things like mega cities, but not good for things like interiors and control panels. Using the SIMPLE SCIFI blend file, FLEX can also create displacement maps at super high resolutions and bit depths. That is something not possible in SPOCK.
Synth can do much of what SPOCK can do (and more) but it uses a different technique and is a longer workflow. It also does not have the stacked algorithms which can be valuable for types of groupings.
The longer answer:
Keep in mind KIT OPS uses KPACKS and SPOCK and FLEX use DPACKS. KPACKS and DPACKS are essentially ordering containers for .blend files and objects. More on that later.
SYNTH, while the most powerful, has a larger learning curve and takes a lot of finessing to achieve results. That said, it is the only product that works with any KIT OPS INSERT (KPACKS) and can do Boolean operations as well. So, you can create some truly stunning compositions with it-- if you can take the time to learn it properly. That said, it is also *significantly* slower than the other 2 products.
SYNTH is good for creating full corridors, robot parts and iterations of products with details and control. It can create variation of just about any object you can think of, but the variations may not be as varied as the other 2 products.
FLEX is based on SIMPLE SCIFI and uses Geometry Nodes to create all the scene geometry. It also can create amazing 2D displacement, texture and dot lighting maps at just about any resolution you want, including 32-bit formats. Because of limitations of Geo Nodes, the placement of the DPACK objects is mostly random, but you have amazing control over the density and scale of objects. It also is the fastest of all three addons.
FLEX is great for creating sci-fi landscapes, hyper detailed alien walls, spaceship hull surfaces and that sort of thing. Mostly at a very large scale.
SPOCK fills in the gap between SYNTH and FLEX. It’s much, much faster and easier to use than SYNTH, and has much more controlled placement (‘packing’) of objects than FLEX. This means you can create more organized groups of objects vs the complete randomness of FLEX-- while still having the super ease of use of FLEX. It’s a tad bit slower than FLEX but the generators aren’t designed for multi-million face models. Unlike SYNTH and like FLEX, it uses instances to speed up processing and allow for more detail. But unlike FLEX, it doesn’t use Geo Nodes because they can’t do the myriad of packing schemes that SPOCK uses.
SPOCK is good for creating details with inherent organization, like circuit boards, tech walls, cockpit interiors, and more. It has the ability to place a fixed number of hero objects which can then be avoided by the next SPOCK iteration. Overall, I think people will use SPOCK for more structured greeble/nurnie effects.
KIT OPS uses KPACKS which are actually folders full of .blend files, called INSERTS that have been stored in a format KIT OPS understands so as to know how to operate when adding them into the scene. For instance, an INSERT may have a number of different objects associated with it, some of them cutting into the *target* object, others cutting into the INSERT itself, and of course unions as well as plain meshes. There are tons of KIT OPS KPACKS available. Some can be found at the KPACK repository: http://cw1.me/kpacks
KIT OPS INSERTS can be created and marketed only be created by KIT OPS.
SPOCK and FLEX use DPACKS which are also comprised of a .blend file, but which has specially constructed Collections inside them. Both SPOCK and FLEX require a specific format for their DPACK collections. SPOCK is a bit different from FLEX and while a FLEX DPACK is compatible with SPOCK, not all SPOCK DPACKS are 100% compatible with FLEX. We may update FLEX so that it will be backwards compatible with SPOCK at a later date.
DPACKS can be created and marketed without needing any special software.
Understanding DPACKS and creating your own {#understanding-dpacks-and-creating-your-own}
A DPACK is a collection of objects which are used to populate a region. DPACKS are simply .blend files which have one or more collections of compatible objects. Place your DPACKS in a “Master Folder” which you can designate using the SPOCK Preferences panel. If you use SCIFI FLEX, you will automatically have access to their DPACKS as well.
SPOCK comes with a Sci Fi DPACK with several collections you can use to create new scenes and even sell them. You can learn more about the license for the DPACK at: http://cw1.me/license.
Creating your own DPACKS {#creating-your-own-dpacks}
If you are creating your own DPACKS, it’s important to understand that in order to work properly, each SPOCK DPACK object should:
- A DPACK is a single .blend file consisting of collections with objects in them
-
The DPACK have many collections but SPOCK only loads collections with prefix SP_
For instance: SP_Pipes or SP_Displays -
Each object in the collection consists of a single mesh
- Or children must have the same origin as the parent (see video)
- Each object can have multiple materials
- Apply Transforms: Objects should be scaled to 1,1,1 and rotated to 0,0,0
- You may want to reference other DPACKS for overall size of objects. This is because if you create them too small, then when someone uses them to pack it may crash Blender. If you create them too large they will not propagate onto the selected surfaces.
You can use any materials you like. Unlike SCIFI FLEX DPACKS, SPOCK DPACKS can use any materials you create or own the distribution license for. If you like, you can use KO-FreeMats which are free distributable and are found at: http://cw1.me/kofreemats
EEVEE+Cycles materials license does not allow you to use them for distribution: http://cw1.me/license
How to Use {#how-to-use}
There are several Youtube tutorials available. Here are a few:
After installation you will have the SPOCK panel now available in the N panel. Like all our products, it will be designated by the first letter a heart: ♥SP
Typical Workflow {#typical-workflow}
Here is a typical workflow for using SPOCK
- Load in a DPACK you want to use using the DPACK chooser
- Choose a packing algorithm or just leave as RANDOM
- Create Collection Sets, one for each DPACK collection you want to propagate.
- Adjust settings for each set you create, including scale, rotation, type, etc…
- Select faces of an object you want to propagate to OR select an entire object which will propagate to all faces.
- Press the PACK button as many times as you like to find a propagation design you approve of.
- Optionally REALIZE the instances you just created.
- Save to a static collection.
Panel Legend: What are all these buttons and controls for? {#panel-legend:-what-are-all-these-buttons-and-controls-for?}
To open the panel image in a separate browser window, right-click here and open link in a new window.
While the interface shown below, with all it’s red dots, may seem a bit overwhelming, it is expanded fully and you only use a few of the controls when using SPOCK. Here is the look of the interface in typical workflow use:
 Typical workflow use {#typical-workflow-use}
Here is the interface with all panels and controls expanded. While there does seem to be a lot of features, many of them are used sparingly.
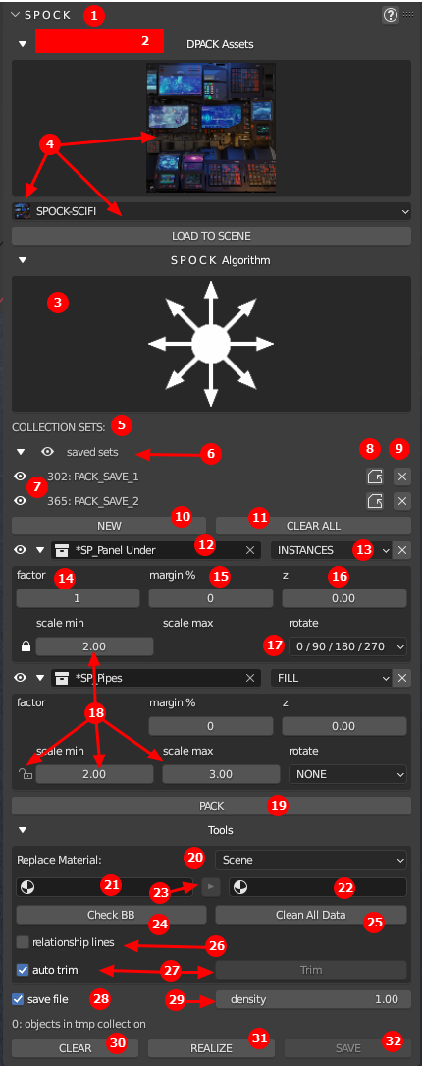 All controls and functions expanded {#all-controls-and-functions-expanded}
-
Name and help button that links to this document
-
If an update is available at Blender Market, it will be shown here. You can dismiss this message if you like. You can always check for an update in SPOCK Preferences.
-
SPOCK Algorithm– SPOCK uses several different packing algorithms. You can choose a specific one to try or choose the Random Algorithm and SPOCK will randomly choose one to work with. When using a given algorithm, SPOCK will randomize the packing order each time the PACK button is pressed. At this time there is no specific seed number, so there is no way to designate the same packing strategy can be repeated exactly.
-
DPACK Assets Thumbnail Chooser– In order to use SPOCK, you must first load in one or more DPACKS. Click on the thumbnail to show all available DPACKS. Choose the one you want to load and press the LOAD TO SCENE button below.
-
COLLECTION SETS– In order to pack objects onto faces, you will need to load specific DPACK collections from the scene. As mentioned above, you should have already loaded into the scene various DPACK compatible collections. Now you should designate which collections you want to use for a specific packing propagation.
Collection Sets can be in any order as the order has no effect on the pack calculation. -
As you work, you may save many collections sets. The eye button toggle the visibility of all collection sets at once.
-
Each collection set saved is shown here. You can use the eye button to toggle the visibility of an individual collection.
-
Will attempt to load the settings used to create the specific collection.
-
Will delete the collection. IMPORTANT: Best to delete the collection using this technique vs doing it manually in the outliner.
-
You can designate which collection you want to use by pressing the NEW button which creates a Collection Set. A Collection set allows you to choose a collection and then set specific properties for that particular collection. You can have as many collection sets as you like for a particular packing propagation.
-
The CLEAR ALL button removes all instantiated Collection Sets. It does not remove any generated packing propagations.
Here are the properties for Collection Sets -
Name drop down– use this to select a specific DPACK compatible collection. While you can use your own created collections (please see How to Create DPACKS), imported collections compatible with SPOCK have an * before the name and appear at the top of the list.
-
Each collection can be given a specific Set Type. They are:
a) INSTANCES– This is the default Set Type. In this case the full collection is used in the pack propagation
b) EMPTY– In this case the specified collection will be used for propagation calculations, but they will not be shown in the final pack. This is good for creating blank spots in the pack.
c) HERO– Enables SPOCK to randomly place a given number of objects in the specified collection. After the number is reached, no other instances of objects from that collection will be shown.
d) FILL– Another very special Set Type which ignores all other collection sets and fills the entire selected faces with a single collection . This is great for creating a “underlay” of objects which can be seen under all the other objects. Great for pipes and panels and adds realistic details to the final pack. -
Factor– this number represents how much of the collection set is used in the final propagation calculation. This number is only used for Set Types: INSTANCES and EMPTY. A higher integer means more of the collection set instances are created and a smaller integer means less instances created. This influences object count, not area. So, for example if Set 1 has a factor of 5 and Set 2 has a factor of 1, then Set 1 objects will be used 5 times as often than Set 1 during propagation.
-
Margin– a % number (integer) for padding or margin around each object instance in the propagation.
-
Z– The Z offset in scene units from the surface of the selected faces.
-
Rotate– you can choose to not rotate, or rotate objects. There are several rotation settings to choose from. You can rotate everything by a specific amount or toggle between a group of rotation values. All are in increments of 90 degrees.
-
Scale– When the lock icon is pressed, both scales are constant. When unlocked, you can create a range of scales for each instance propagation.
-
PACK button– propagates the selected faces based on the Collection Sets and their respective settings. If no faces or objects are selected, the button will not work. You cannot pack onto a selected object that is part of a DPACK. When finished, pack will create a collection called “PACK_tmp” with all of the instanced objects created. Each time PACK is pressed, the PACK_tmp collection is erased and a new one is created.
The following are Tools which are typically rarely used but may help in workflow
-
Replace Material feature. This will replace all instances of a specific material with the replacement material based on the scope. You can set the scope of replacement to Scene or Selected objects.
-
Select material you want to replaces
-
Select material to use for replacement
-
Arrow button to perform the replacement.
-
Check BB button will create a non-rendered bounding box around the object. This is useful for debugging and/or creating DPACKS. When the PACK button is pressed, SPOCK first creates bounding boxes for all the specified collection objects, and uses the bounding boxes to correctly pack, then replaces the bounding boxes with instances of the collection objects.
-
When doing successive packing, and clearing previous packs, you can accumulate objects in the scene. Clean All Data is the same as using the menu: File > Clean Up > Recursive unused data blocks
-
During packing, a non-rendered parent object is created. This helps manage all the instances in the pack. The trouble is, it also creates dotted relationship lines. This flag turns the lines off and is the same checkbox as the Viewport Overlays> Relationship Lines. NOTE: This turns off all relationship lines in the scene.
-
Autotrim should be on by default. It removes all instances whose bounding boxes extend beyond the selected geometry. It is here mostly for debugging and support purposes.
The following are global properties and functions which affect all collection sets
-
Save file checkbox– If you are working with a huge number of instances, you may want to automatically save your file before you press the PACK button– as sometimes Blender may run out of memory.
-
Density– tells SPOCK how dense to pack the selected faces. Range from 0 to 2.
-
CLEAR will clear out all instances for the last pack regardless of what is selected.
-
REALIZE will convert all the instances in PACK_tmp to real individual objects. With large pack propagations, this may take a bit of time and will result in a much larger file and slower execution. The converted instances are still located in the PACK_tmp collection.
Some modifier keys:
a) CLICK– sets all instances to a single user– thus making them non-linked objects
b) CTRL+CLICK– sets all instances to a single user AND joins them into a single object, removes the layout objects and sets the joined object to auto smooth.
c) ALT+CLICK– set all instances of a saved collection to single users thus making them non-linked. -
SAVE button will copy the PACK_tmp collection to a new collection called PACK_saved. Subsequent presses of the button save to serialized collections named PACK_saved.001, PACK_saved.002, etc…
Preferences {#preferences}
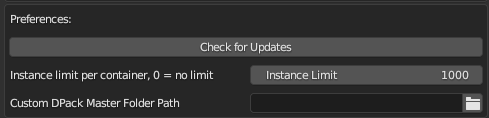
- Check for Updates: Will look for a newer version and display it in the n-panel if there’s a new one in the marketplace to download.
- Instance Limit: This is the limit of object instances to pack at once. 1000 instances will take 10-30 seconds to complete. If more than that is needed you can select an individual face or divide a face into smaller areas to pack. “Fill” sets have their own limits, they don’t count against the rest.
- Custom DPack Master folder: Point this to the location that contains the DPack folders. NOT the folder that has the DPacks. It will then show them in the addon to quickly load to scene
Using existing DPACKS with SPOCK {#using-existing-dpacks-with-spock}
If you have existing DPACKS from SIMPLE SCIFI and SCIFI FLEX, they can be used with SPOCK. If the SCIFI FLEX addon is installed, your DPACKS should already be displayed. If not, place them *unzipped* into the DPACKS folder in your addons OR you can define a masterfolder for them in SPOCK’s preferences. The folder structure should be:
Masterfolder (or dpacks folder in the spock addon) > DPACK foldername > DPACK.blend files.
You’ll want to append or add via KIT OPS the cw-gen-material.blend material:

You can get it here.
Once you’re ready, import your legacy DPACKS as usual. Then follow the instructions:
Tips and Tricks {#tips-and-tricks}
- Save your layers / faces individually as you create layouts that you like. Incorporate saving layer sets into a workflow where you can build up a composition you like, and redo layers + faces as components.
- Test a collection out with various settings by itself to get the right size / rotation and other settings figured out before incorporating it with others.
- If your saved layers are colliding with each other you can move them by their top level object wireframes without needing to re-pack.
- You can re- use the same collection for multiple things. Use it multiple times for different settings combinations or use it as a different type like an Empty set.
- Lower the density to get interesting outlines around packed instances.
- Merge and divide faces for variations on the larger patterns of what is packed. Use edge loops to create new faces and control regions where you want different combinations of instances.
- Test different combinations of spacing. Density, Empty sets, and margins all create different types of spacing. When using an empty set, try several different factors to change its impact.
- There is a point where too many instances in your scene will bog everything down. Around 20k instances will be noticeably slower. Try baking far away details into a material if the camera wont notice a difference.
- You can duplicate and rotate objects to pack by 45 degrees or other angles if you want to rotate by something other than 90/180/270, but the bounding box will have extra space in the corners after rotation.
- If you need more control over the settings of a collection you can add it multiple times with the different settings you need.
- Remember, unlike FLEX DPACK propagation, SPOCK uses instances. So, this means you can easily click on an instance and move it to quickly align it after packing.
- If you are using the SciFi DPACK that comes with SPOCK, you can easily change the display texture or button label texture. Here’s how. Selecting the instance, go to outliner and press numpad ‘.’ (period) to select that instance in the outline, and rename it to anything you like. Each time you rename an instance, it recalculates the specific texture it will use for that object.
Troubleshooting {#troubleshooting}
Help {#help}
If you’re having issues, please first try http://cw1.me/trouble. If you still have problems, help us help you by following carefully http://cw1.me/helpyou . You can always ask questions at http://cw1.me/discord
Known limitations {#known-limitations}
- Performance limits instance count ~1k takes about 30 seconds to place all the objects on a typical machine (i7, Nvidia card, 16GB RAM.
- Does not work well on curved surfaces with large scale collections.
Not all faces being propagated by SPOCK {#not-all-faces-being-propagated-by-spock}
Probably has to do with the max instances value in Preferences. Try using the ALT+Pack button to use the max instances per face.
No propagation happening {#no-propagation-happening}
If you don’t see any instances when packing they may be too large to fit.Try setting the scale smaller.