SLICE-IT+BEND-IT User Manual
By Chipp Walters and Anthony Aragues
The USER MANUAL for the slice modifier can be found at:
https://cw1.me/slice
Introduction
Welcome to the SLICE-IT+BEND-IT addon for Blender 3.6+. This manual is designed to help you navigate through the installation, setup, and use of SLICE-IT+BEND-IT to enhance your 3D modeling workflow with an easy to use set of tools.
Background
Not too long ago, we created SLICE-IT, an addon to create regularly spaced subdivided geometry using one, two or three axis of a mesh object. We use this a lot for all sorts of object modifications including displacement and remeshing. We found that a properly sliced object worked well when bending it. Unfortunately, with Blender there has always been the challenge of trying to find the correct axis to bend an object on, and is compounded by the lack of proper bend resolution. So, we decided to create a new set of features and call them BEND-IT. and now, for the first time it is relatively simple to bend any object around a circular path or open spline in Blender. This manual will go through the details on how to use SLICE-IT+BEND-IT.
SLICE-IT+BEND-IT: What is the difference?
The SLICE-IT+BEND-IT addon comprises of two different functions. The first is SLICE-IT and the second is BEND-IT.
What does SLICE-IT do?
When applied to an object, SLICE-IT allows you to slice meshes in even increments in any X,Y or Z direction, as well as XY, YZ, and XZ. You can choose the number of increments and you can also undo.
Also, if you are in Edit mode, SLICE-IT will only slice the selected faces. This added functionality can be very useful.
What does BEND-IT do?
When applied to an object, BEND-IT will slice (optionally) and bend the selected object around a circular spline based on the direction you designate.
Unlike SLICE-IT, BEND-IT creates a duplicate object, applies all modifiers and transforms, and then slices it. It then hides the original object. You can easily Undo if you want to change the bend settings.
There are a number of different options available as shown:
BEND-IT allows you to:
- Optionally Slice in user defined increments
- Choose how much of the circle you want your object to wrap around
- Flip + Bend feature helps in some edge cases where the original object transform is not correct
- Open Curve feature allows you to open the circle and then edit it how you like so you can deform the object along a spline.
- When finished, you can use the Bake Bend feature to finalize the deformed object into a finished mesh.
Installation Guide for SLICE-IT+BEND-IT
Welcome to the exciting world of SLICE-IT+BEND-IT, where your creative potential with Blender 3.4+ is about to expand! Follow these simple steps to get started:
Prerequisites:
Before installing SLICE-IT+BEND-IT, ensure that you have Blender 3.4 or later installed on your computer. If you need to update or install Blender, visit the official Blender Foundation website at blender.org.
Step-by-Step Installation:
Download the Addon:
Locate the SLICE-IT+BEND-IT addon file, which should be a .zip file. This can typically be found in the purchase confirmation email or the downloads section of the website where you acquired SLICE-IT+BEND-IT.
Open Blender
Launch Blender and open a new or existing project.
Access Preferences
Navigate to Edit > Preferences. A new window will pop up.
Click on the Add-ons tab within the Preferences window.
Install the Addon
NOTE: If you already have the old SLICE IT installed, FIRST delete it, restart Blender and then install SLICE-IT BEND-IT.
In the Add-ons section, you’ll find an Install… button at the top. Click on this button.
A file browser will appear. Use it to navigate to the location of your downloaded SLICE-IT+BEND-IT.zip file.
Select the .zip file and click Install Add-on from the file browser.
Enable the Addon
After installation, a new entry for SLICE-IT+BEND-IT will appear in the Add-ons list.
Find SLICE-IT+BEND-IT in the list and check the box next to it to enable the addon.
Once the checkbox is ticked, SLICE-IT+BEND-IT is active and ready for use.
Save Preferences
To ensure SLICE-IT+BEND-IT loads in every new Blender session, click on Save Preferences before closing the Preferences window.
Post-Installation
After installation, it’s a good practice to restart Blender.
You can find SLICE-IT+BEND-IT in the N panel labeled ♥S+B. FYI, we use the ♥ symbol as a prefix for all our addons.
Troubleshooting
If SLICE-IT+BEND-IT does not appear in the Add-ons list after installation, ensure that the .zip file was not accidentally unzipped.
For any issues related to Blender compatibility, refer to the Troubleshooting section of this manual.
Need Help?
If you encounter any issues or have questions during the installation process, feel free to reach out to our support team at http://cw1.me/discord
By following these instructions, you should have SLICE-IT+BEND-IT installed and ready to enhance your Blender projects. Enjoy your journey into advanced displacement mapping and geometry generation!
Basic Workflow
Here’s basically how it works. First you select the DPACK you want to use, then you apply a generator and then once displayed in Blender, you tweak the generator settings in the modifier panel for the newly generated FLEX object.
The Interface
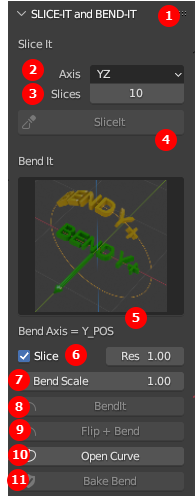
- Help button takes you to these docs
- SLICE-IT Axis(s) to slice
- How many slices
- SLICE-IT button
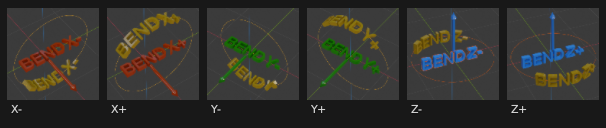
- Axis to bend and label of chosen axis
- Automatically Slice before bending and increment in degrees to slice object
- How far you want to bend object around a circle: 1=360 degrees, 0.5=180 degrees, etc.
- BEND-IT button
- Button to Flip and Bend if the result doesn’t look correct
- Open or Close the circle curve
- Apply curve modifier to BEND-IT object