SIMPLE SKETCH PRO Documentation
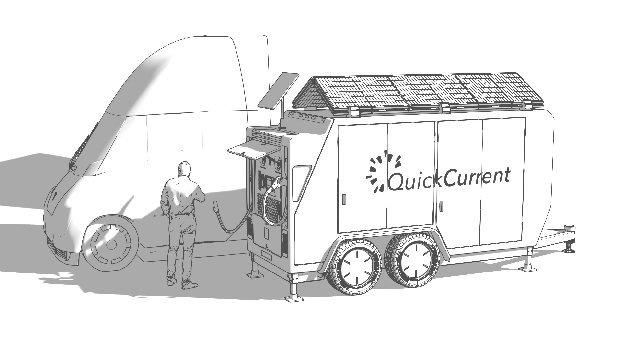
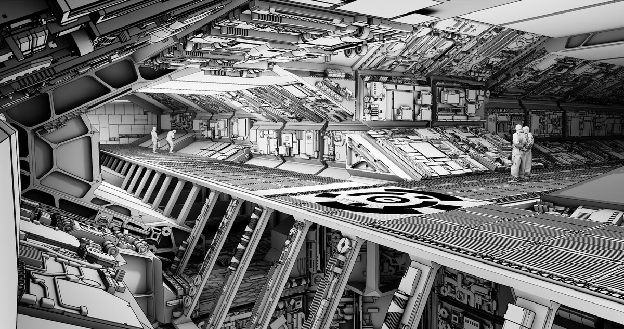
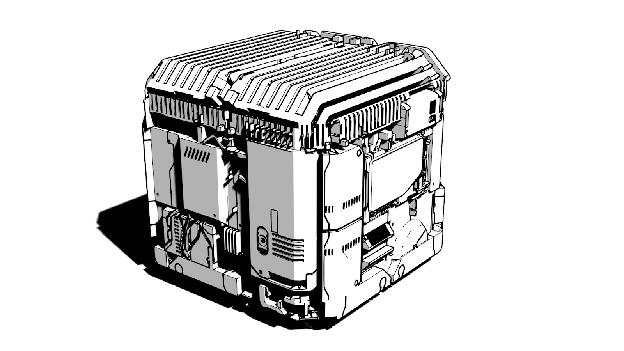
Rendered using SSP Sketch Style Preset
Created by Chipp Walters 2025
Parts ©2025 Altuit, Inc
For Blender 5.0+
You need to be in camera view in order for line art to work!
Introduction
SIMPLE SKETCH PRO is a powerful Blender addon designed to simplify the process of creating stylized line art and using specified presets. It provides a comprehensive set of tools for artists and designers who want fine control over line renderings using different material states, and background settings and all previewed within Blender’s viewport. It can use either EEVEE (faster) or Cycles to create final renders.
Key Features
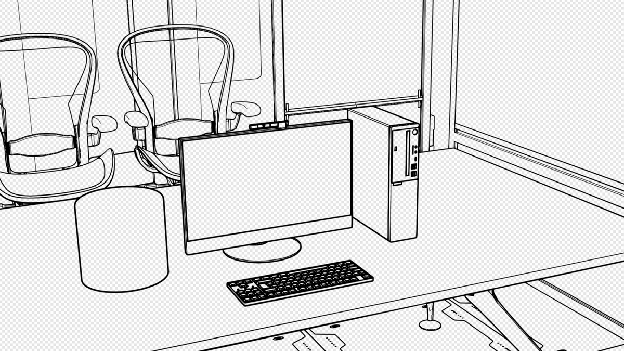
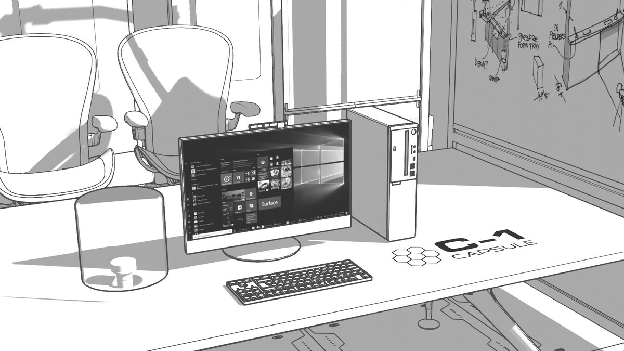
- Several Presets: Quickly switch between None (no preset), Black & White, Clay (AO), Blueprint (light-blue lines), Lines Only (transparent background), Sketch Style (SketchUp looking render with shade and user definable shadow) and Comic (high-contrast with a sharp mid-tone)
- Custom Styles (NEW in 1.3.0): Save your own looks as reusable styles that appear in the picker beside the built-ins, stored in a folder you control so they survive add-on updates. Update, rename, duplicate, delete, and export/import styles to share them. See Custom Styles.
- Line Art Management: Enable and control line thickness, crease settings, color and line art layers.
- Screen Space: By default, Blender renders lines with perspective. When Screen Space is turned ON, SSP tries its best to make sure every line type has an equal width.
- Render Configuration: Simplified toggling between EEVEE_NEXT and Cycles render engines.
- Optimized workflow for large scenes
- Scene Management: Tools for managing material overrides and line object states.
-
UI Integration: All tools are integrated into the Tool Shelf under the
♥SSPpanel for easy access. - The ability to use SSP with your existing scene setup including your own lighting and materials.
Blender Compatibility
SIMPLE SKETCH PRO is compatible with Blender 5.0 and above, taking advantage of the latest EEVEE_NEXT render engine features for optimized performance. It ships as a Blender Extension.
Installation
System Requirements
- Blender Version: 5.0 or higher
- Operating Systems: Windows, macOS, Linux
Installing SIMPLE SKETCH PRO
Just drag and drop the .zip file to the viewport in Blender 5.0+.
OR
-
Download the SIMPLE SKETCH PRO
.zipfile from the official website or distribution source. -
Open Blender and go to
Edit > Preferences > Get Extensions. -
Click the drop-down menu in the top-right and choose
Install from Disk..., then navigate to the downloaded.zipfile. - Select the file and confirm. The extension installs and enables automatically.
-
If needed, verify it is enabled under
Edit > Preferences > Add-ons(search for SIMPLE SKETCH PRO).
Verifying the Installation
-
The addon panel will appear in the Tool Shelf (
NPanel) under the♥SSPtab. -
If the panel does not appear, ensure the addon is enabled under
Preferences > Add-ons.
Videos
Quick Tutorial
User Interface
Accessing the Panel
The SIMPLE SKETCH PRO UI is located in the 3D Viewport under the Tool Shelf (N Panel). Click on the ♥SSP tab to reveal all controls and settings.
Panel Layout
The UI is divided into the following sections:
- Style picker & Styles: Choose a built-in preset or one of your own custom styles, and save/manage your styles. See Custom Styles.
- 1. Line Art: Settings for line visibility, thickness, and crease angles.
- 2. Overrides: Tools for toggling object overrides and line art collection management.
- 3 Render Settings: Options for render engine toggling, background control, and color management.
- Utilities: Quick-access buttons for resetting settings
The sections are ordered based on the first time use workflow.
IMPORTANT NOTES!
- Avoid editing your scene when using any preset modes, as SSP resets object materials. Actions such as renaming, importing, editing materials, or duplicating may not reset correctly when switching back to None mode. That said, you can use any of the controls in the SSP panel in any of the presets.
- SSP toggles Line Art properties by moving objects to a custom SSP Collection called SSP_Line_Art_Overrides. When you toggle off the override, it moves back to the collection it came from. If that collection does not exist, it moves the object(s) to the SSP_Line_Art_Rmv_Overrides collection.
- When you Reset SSP Settings, it removes only the objects, collections, materials, worlds and scene/object properties that SSP itself created. If there are objects left in SSP_Line_Art_Rmv_Overrides then it will not remove that collection. Reset no longer does a global “Purge All,” so your own unused materials, images and node groups are left untouched (as of 1.2.11). Reset also never touches your custom styles library — your saved styles are safe.
User Interface
The numbered callouts on the panel correspond to the controls listed in the second column:
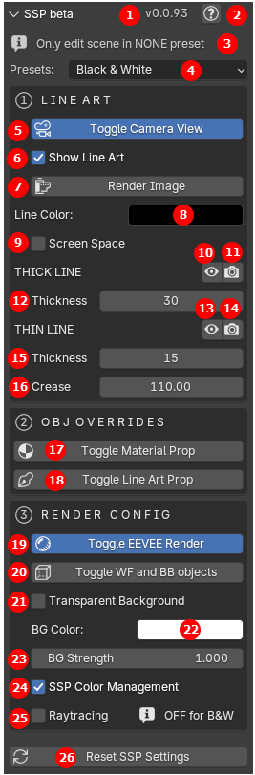 |
1. Version number. 2. Documentation link — opens this document. 3. Warning: Do not perform edits (outside this panel) unless in the NONE preset! 4. Preset name. Do not edit your scene unless you’re in the NONE preset. You can use any available panel controls in any preset. 5. Toggle Camera View — Toggles the Camera view. Blender Line Art only works correctly in Camera View. 6. Show Line Art — Turns Line Art on and off. Forces a Line Art render, which can take some time depending on scene complexity. 7. Render Image — Renders the image (same as F12). 8. Line Color — Color for all lines. 9. Screen Space — Lines normally render with perspective; when Screen Space is enabled, SSP attempts to render all line types with equal width. Sets the proper Geometry Nodes setting each time it is toggled on/off. 10. Thick Line — viewport visibility (eye icon): thick lines are hidden in the viewport to optimize scene setup, but they are still rendered. 11. Thick Line — render visibility (camera icon): when off, thick lines are not rendered. 12. Thick Line Thickness — Line thickness for the silhouette (thick) lines. 13. Thin Line — viewport visibility (eye icon): thin lines are hidden in the viewport to optimize scene setup, but they are still rendered. 14. Thin Line — render visibility (camera icon): when off, thin lines are not rendered. 15. Thin Line Thickness — Line thickness for the thin lines. 16. Crease — The crease angle controls the number of lines visible when rendering softer forms. A lower crease angle results in fewer lines. 17. Toggle Material Prop — Switches the display mode of the selected object’s material between its normal state and the current material. Useful for materials like glass and decals. 18. Toggle Line Art Prop — Controls the visibility of lines for a selected object. Enable it to display the object’s lines, or disable it to hide them. Useful for concealing unwanted lines. 19. Toggle EEVEE Render — Toggles between the EEVEE and Cycles renderers. 20. Toggle WF and BB objects — Toggles the visibility of all objects set to display as wireframe or bounds in the viewport. Crucial for concealing boolean objects. 21. Transparent Background — Toggles the background on and off so you can render with transparency. 22. BG Color — Controls the background world color, if allowed by the preset. 23. BG Strength — The strength of the world background color. 24. SSP Color Management — Overrides the user’s color management settings. Important for rendering perfect black on white. 25. Raytracing — Turns EEVEE Raytracing on and off. Leave off for most line-drawing presets. 26. Reset SSP Settings — Resets the scene so there are no SSP settings. Removes persistent object and scene properties. |
|---|
Select Sun (not numbered above — this button is only visible in the Sketch Style and Comic presets): selects the SSP_Sun object so you can manually set its angle.
Using SSP
Large scenes
Optimizing your workflow is crucial when working with very large scenes, as rendering the line art might take a considerable amount of time when you update properties.
- Do not immediately switch to a preset.
- Hide all mesh objects if possible then switch to a preset of your choice.
- Turn off viewport visibility for all objects using the eye icon button for both Thin and Thick Lines.
- Turn on all mesh objects. Now you can select them all and press the Toggle Line Art Prop button. This will move them all to the SSP_Line_Art_Overrides collection (don’t worry, they will go back to their respective collections in a minute).
- Find one or two you want to experiment on using the line art properties.
- Turn on the Thick Line viewport visibility button and adjust the line art settings.
- Toggle it off and turn on Thin Line viewport visibility button and adjust its settings.
- Toggle off both Thin and Thick Line viewport visibility buttons.
- Select all the mesh objects that are in the SSP_Line_Art_Overrides collection (right-click on collection and choose Select Objects) and Toggle Line Art Prop back on. This will move all the objects back to their original collection.
- Now, because the viewport visibility is off yet the camera icon is on, you can press the Render Image button and see your final render.
Using Screen Space
The Screen Space checkbox maintains consistent thick and thin line weights, preventing them from diminishing with distance from the camera. This is particularly useful when rendering large scenes.
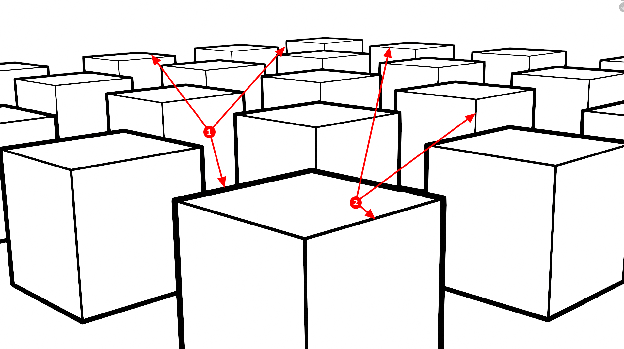
Screen Space OFF (default): This render shows a regular render where the thick lines (1) and thin lines (2) change thickness based on the distance from the camera
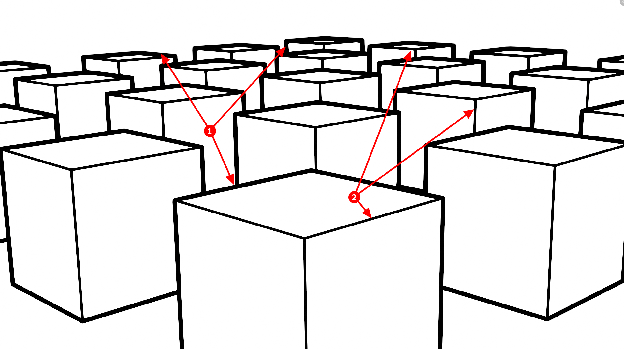
Screen Space ON: This render shows the thick lines (1) and thin lines (2) maintain the same thickness no matter the distance from the camera
Unfortunately, screen space is no longer supported in the latest line art version and now must be managed using a Geometry Nodes modifier. Currently, we cannot link the correct driver to the modifier for each scene’s camera. Therefore, each time you toggle the Screen Space checkbox, we update the modifier to match the currently selected camera and view. If the line weights appear incorrect, toggle the checkbox to fix them.
Screen Space needs an active scene camera. It derives line widths from the camera’s focal length, sensor size, and the render resolution. If you enable Screen Space with no camera set for the scene, the panel shows a “Set scene camera for Screen Space” warning and the widths can’t be calculated — assign a camera, then toggle the checkbox.
Adjusting line thickness
The Thick Line and Thin Line thickness sliders read as on‑screen pixels (1–200). Just raise or lower the value until the lines look right — a value of 1 is a hairline, and higher values give bolder lines. When Screen Space is on, this pixel width is held constant regardless of an object’s distance from the camera.
If you need to go beyond the 1–200 range, you can also select the SSP_Thick_Line and/or SSP_Thin_Line grease pencil objects and scale them directly — use the Transform panel to add scale, or press ‘S’ and drag in the viewport.
How to force lines to show and hide
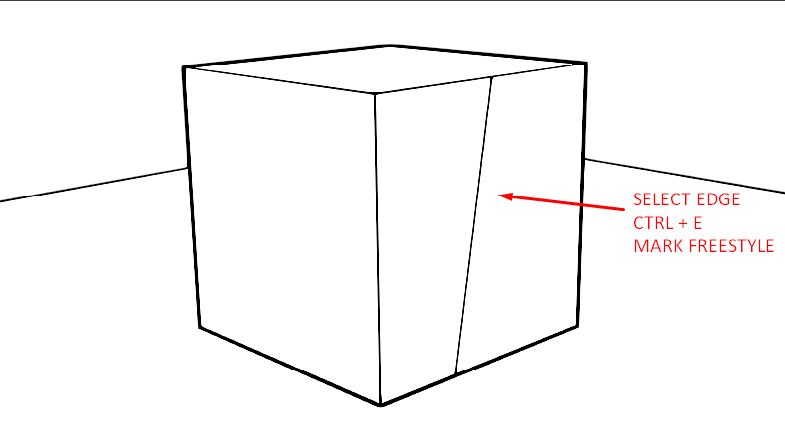
You can mark edges with either Sharp or Freestyle to force them to be displayed. You can also see the Crease angle to show and hide different lines. Setting a Crease angle of 180 will show every line in a mesh. Setting a Crease angle of 0 will hide every line in a mesh other than sharps and freestyle lines. If the Autosmooth modifier is turned on, then it will also show the calculated sharp lines as well.
The silhouette (outline) of an object is always shown. If you want to manually control all the interior edges, then remove Autosmooth and set the object to smooth shading and apply either Sharp or Freestyle properties to selected edges.
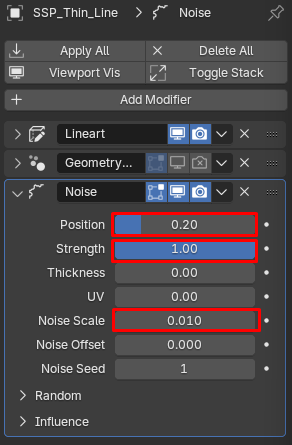
How to create jagged line renders?
Currently, there is not a simple way to do this. We may add this in an upcoming version. But, here’s the manual way to do it.
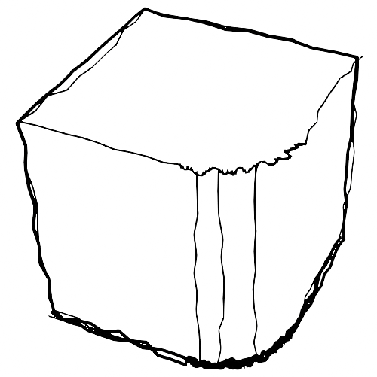
Adding a jagged line effect requires adding modifiers to both the SSP_Thick_Line and SSP_Thin_Line objects (in the SSP_Line_Art collection).
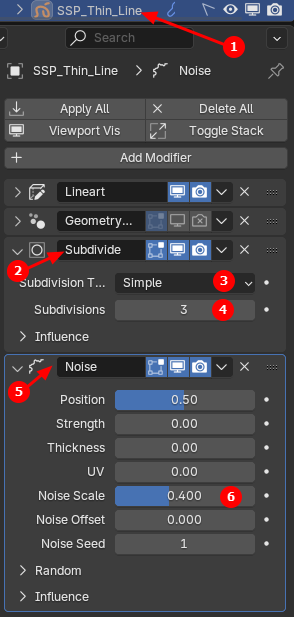 |
1. Select either the SSP_Thick_Line or SSP_Thin_Line object (you’ll need to do this for both). 2. Add a Subdivide modifier. 3. Set the Subdivision Type to Simple (not Catmull-Clark). 4. Add a sufficient number of Subdivisions. You can adjust this number later as you desire. 5. Add a Noise modifier. 6. Change the Noise Scale. Optionally, you can also adjust the Position and Strength settings for more complex scenes (as shown below). |
|---|
You may want to make sure to use the same settings for both the SSP_Thick_Line and SSP_Thin_Line objects.
More complex object uses the following settings:
Presets
There are a number of different presets you can use to achieve a variety of different looks in your renders.
Black & White Preset

This preset is basically a Black and White drawing. You can adjust the background color and line color if you like.
Clay Preset

The Clay preset uses a strong Ambient Occlusion (AO) effect. Often when using the Clay preset, you may want to change the AO settings. Here’s how you do it:
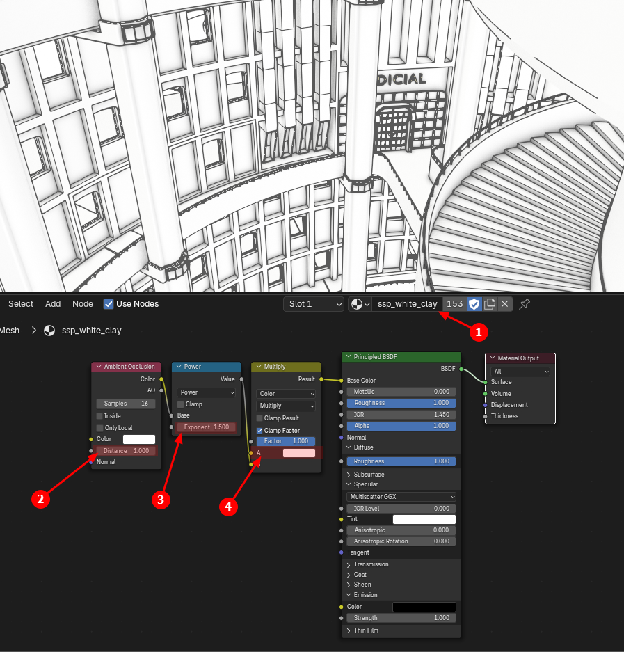
-
Select any object in the scene and you will see it has been assigned the ssp_white_clay material.
-
Adjust the distance to change the distance of the AO effect.
-
Adjust the exponent to change the amount of AO effect.
-
Adjust the color if you want to change the color of the clay material
 |
This works well in Cycles so you may want to toggle EEVEE off and adjust the BG (Background) Strength higher. |
|---|---|
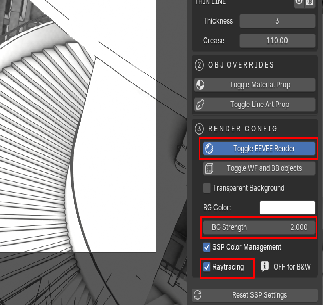 |
You can also render nicely in EEVEE by turning on the Raytracing and setting the BG Strength higher. |
Blueprint Preset
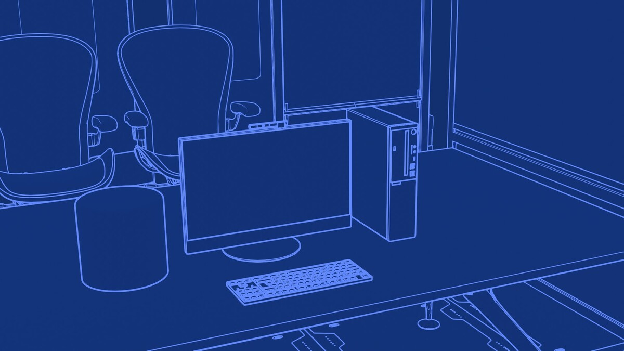
This preset creates a blueprint effect for the scene. You can change the line color and background color. To change the background color you need to adjust as follows:
 |
First, adjust the background color |
|---|---|
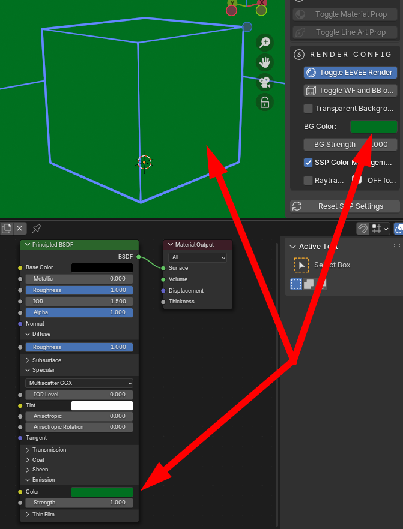 |
Next, adjust the Emission color. You can use the eyedropper to select the background from above (or just copy/paste the color). |
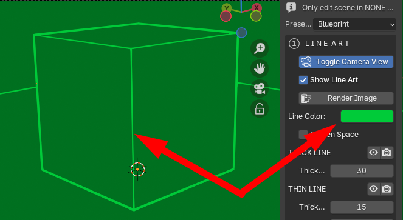 |
And of course, change the line color to match. |
Lines Only Preset
Use this preset to create a render with only lines on a transparent background. Be sure to save the render as a PNG with alpha channel. Note, you may encounter some errors if objects are outside of the camera view. If you do, you may want to render in Black & White preset and use that as a selection channel in your compositing app.
Using Blueprint Preset
Of course it’s easy to edit the line color by just setting it. But what if you want to change the background color of the blueprint? This means you’ll need to also change the blueprint material ssp_blue.

-
Change the line color
-
Change the background color. Make sure all these match.
Sketch Style Preset
This preset uses a sun object to cast shadows. To change the shadow direction, use the Select Sun button to select the object then press rr (the r key twice). This will allow you to interactively rotate it by dragging your mouse around.
You can also move the sun object into the camera view and use the direction gizmo to drag around the sun direction as shown below:
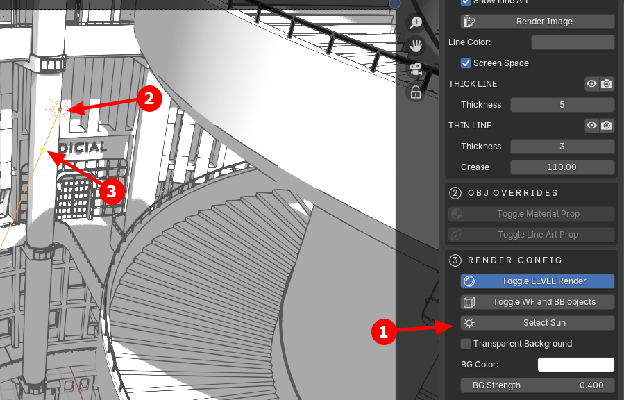
-
Select Sun button to select sun and press ‘rr’ (r button twice) to rotate in viewport
-
SSP_Sun object selected
-
Gizmo for manually rotating sun (in case you don’t want to press ‘rr’
 |
You can darken and lighten the shadows by increasing/decreasing the BG Strength setting for the background. |
|---|
Comic Style Preset
* Note: This preset does not work with Cycles. Use EEVEE only.
This preset creates high contrast renders with a sharp delimiting middle tone. Change the shadow direction as shown in Sketch Style preset above.
Here’s how you can change both the color and amount of shade for the middle tone:
 |
Edit the ssp_comic material. Adjust the gray and white sliders to move the middle tone around the objects. Adjust the gray color to change the color of the middle tone. Adjust the white color to change the color of the overall scene. |
|---|
Custom Styles (NEW in 1.3.0)
Beyond the built-in presets, you can save your own looks as custom styles. A custom style appears in the style picker right beside the built-ins and stays available in every file you open.
What a style remembers
When you save a style, SSP captures everything that defines the look:
- the material on the active object,
- the world (background),
- the Line Color, Thick/Thin Thickness, Crease, and Screen Space setting,
- whether the style turns on the SSP_Sun and a Transparent Background.
Where your styles are stored
Styles live in a folder you control — by default Documents/Simple Sketch Pro/. You can change it in Edit > Preferences > Add-ons > SIMPLE SKETCH PRO > Styles Library Folder.
Because this folder is outside the add-on, your styles are safe when you update SSP. Each style is a small file plus a preview image; nothing is buried inside the add-on that an update could wipe.
Moving to a new computer or recovering after a reinstall: copy your Simple Sketch Pro folder to the new machine, set the Styles Library Folder preference to point at it, and click Reload Styles Library (in the Styles box, or in the add-on preferences). All your styles reappear. The same folder can live in Dropbox/OneDrive to sync between machines, or be shared with a teammate.
Creating a style — step by step
- Start from a close preset. Pick a built-in preset similar to the look you want (for example Black & White). This loads the SSP assets and gives you a good starting material/world to tweak.
- Build the look with Blender’s normal tools. Edit or assign a material on your object, set up the world background, and dial in the Line Color, Thickness and Crease in the SSP panel. Turn SSP_Sun and Transparent Background on or off however you want them.
- Save it. In the Styles box, click ➕ Save Current Look as Style.
- In the dialog, type a Name, choose whether to Capture World, and confirm the Use SSP_Sun and Transparent Background options. Click OK.
- Your new style is added to the picker with an automatically rendered thumbnail, and is selected so you see it applied right away.
Tip — capturing a tweaked material: a style captures the active object’s active material. If a preset is currently applied and you want to capture a material you’ve edited, use Toggle Material Prop on that object first so SSP doesn’t overwrite it before you save.
Using a style
Pick it from the style picker — the thumbnail grid at the top of the panel (click the large thumbnail to open the full grid), or the Style dropdown beneath it. A custom style applies exactly like a built-in preset: it sets the material on every (non-overridden) object, swaps the world, applies your line settings, and turns the sun/transparency on or off.
Managing your styles
When a custom style is selected, the Styles box shows these buttons:
- Update — overwrite the selected style with the current look (handy after tweaking its material or line settings).
- Rename — change the display name (the style keeps working in files that already use it).
- Duplicate — make a copy to use as the starting point for a variation.
- Delete — remove the style from your library.
-
Export / Import — save a single style to a portable
.sspstylefile (or load one). Use this to share a style with someone else or to back up an individual style.
The 🔄 Reload button at the top of the Styles box re-scans your library folder.
Thumbnails
The picker shows a small preview of each style. Custom styles get a thumbnail automatically when you save them. For the built-in presets, click Generate Style Thumbnails once (it appears in the Styles box when no thumbnails exist yet) to render their previews. Thumbnails include the line art so even line-driven looks like Black & White and Blueprint are easy to recognize.
Troubleshooting
Addon Not Appearing:
- Confirm the addon is enabled in Blender Preferences.
Thin lines too jaggy
-
Consider using these settings:
Stray lines appearing in Lines Only mode
This can be an artifact created by the fact that most of the object is outside the camera view. If you encounter this, then your best bet is to render in Black & White mode and use that for an alpha channel in your compositing program (like Photoshop).
Transparent background color comes through an object
- Be sure your object is a mesh
- Be sure your object has a material
Getting Support
For additional support, visit our Discord: https://cw1.me/discord
See the simple-sketch-pro channel there.
Credits
- Author: Chipp Walters
[monospace]SIMPLE SKETCH PRO is developed and maintained by Chipp Walters, Altuit, Inc.