Peashell — User Guide
Peashell is a native Windows desktop app that wraps the Photopea image editor. It gives you the full Photopea editor in its own window, with a thin toolbar on top that adds native Windows file dialogs, file associations, and quick tab management.
The editor itself is the hosted Photopea web app running inside the window — so you always get the current version of Photopea, with no separate install.
Requirements
-
Windows 11, 64-bit (the build is
win32-x64). -
An internet connection. The app loads the hosted Photopea editor; it does
not work offline. On first launch, if there’s no connection (or a network/proxy
blocks
www.photopea.com), the editor area won’t load.
Installing / Running
This is a portable app — there is no installer.
-
Unzip
Peashell-win32-x64_v<version>.zipto any folder you like (for exampleC:\Apps\Peashell\, your Desktop, or a USB drive). -
Open the unzipped folder and double-click
Peashell.exe. - The window opens directly into the Photopea editor.
That’s it — nothing to configure on first run.
Moving the app: You can move or rename the unzipped folder at any time. The app re-points its file association to its current location automatically on the next launch, so a moved folder fixes itself.
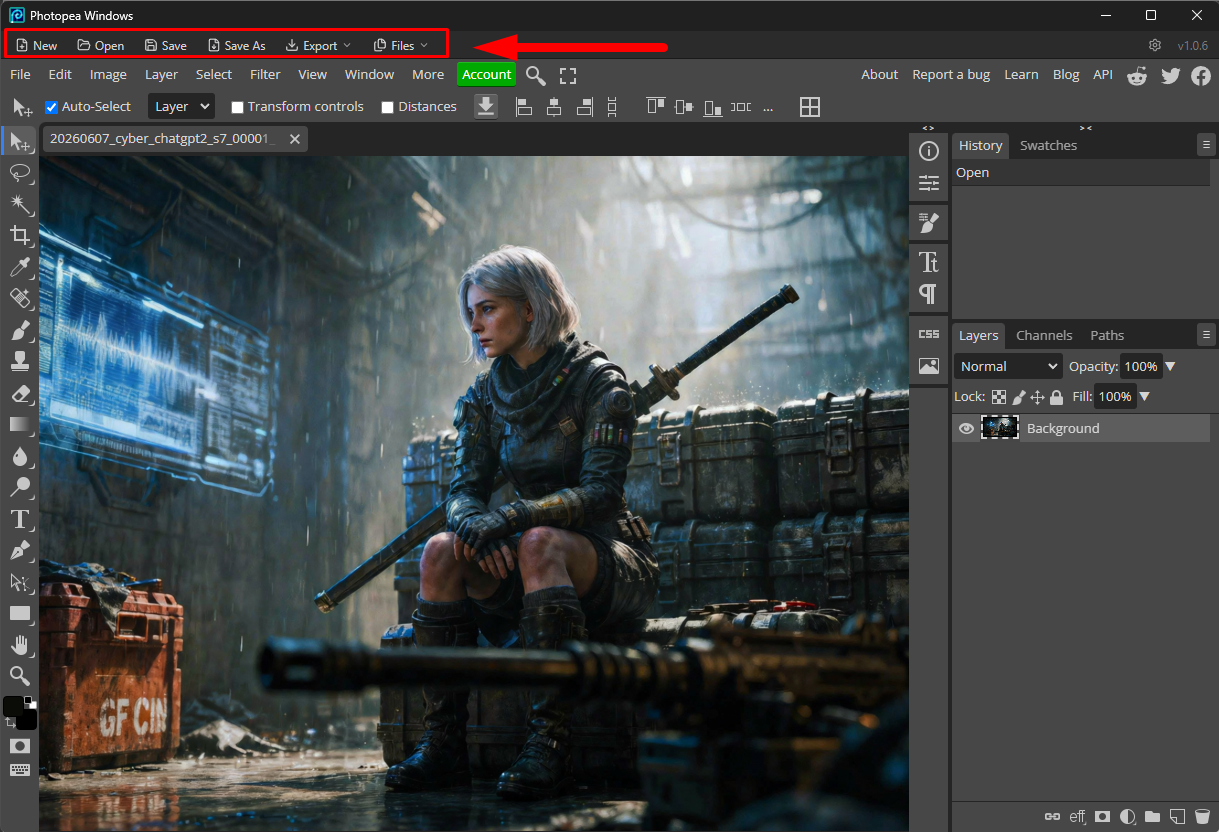
The Window
- Top: a thin toolbar (New, Open, Save, Save As, Export, Files, AI, plus the settings and version on the right).
- Below the toolbar: the full Photopea editor, including Photopea’s own menu bar (File, Edit, Image, Layer, …) and all of its tools, panels, and tabs.
Both work together: use the toolbar for native Windows file dialogs and quick actions, and use Photopea’s own menus for everything the editor offers.
The window remembers its position and size between launches.
Toolbar Actions
| Button | What it does |
|---|---|
| New | Creates a new blank document (a new tab) in the editor. |
| Open | Opens a native Windows file dialog and loads the chosen image as a new tab. Right-click Open to see your recent files (the last 12, with full paths) and reopen one. |
| Save | Overwrites the original file of the active tab, in place. (For a tab that was never opened from disk, use Save As.) |
| Save As | Opens a native Save dialog so you can write the active document to a new file/location. |
| Revert | Discards all unsaved changes to the active tab and reloads it from the last version saved on disk (after a confirmation). Enabled only for tabs opened from / saved to a file. |
| Export | Drop-down to export the active document as PNG, JPG, WEBP, or SVG via a native Save dialog. |
| Files | Lists every open document. Click a name to switch to that tab; click the folder icon to reveal the file in Explorer (enabled only for documents saved to disk). |
| AI | Drop-down of on-device AI tools for the active document: Upscale (enlarge), Remove Background, and Straighten & Crop Photograph (see AI Tools below). |
| ⚙ (settings) | Helps you make Peashell your default image editor. On Windows, it registers Peashell as a PNG handler and opens Settings → Default apps. On macOS, it opens a short guide to setting default apps on Mac (see below). |
| v |
The app version, shown at the far right. |
Save vs. Save As vs. Export
- Save writes back to the same file you opened, in its original format. Use it for quick “keep editing the same file” work.
- Save As lets you pick a new name, folder, and format.
- Export is for producing a web/output copy (PNG/JPG/WEBP/SVG) without changing what “the original file” is for that tab.
All three use native Windows dialogs rather than Photopea’s in-browser file browser, so they behave like any other Windows app.
Revert to saved
Made a mess and want to start over from the last saved version? Revert discards every unsaved change in the active tab and reloads the file from disk. It asks you to confirm first, then reopens the saved version in the same tab — so Save still writes back to the same original file afterwards.
The button is enabled only when the active tab has a file on disk to revert to; for a brand-new document or an AI/Straighten result that hasn’t been saved yet, it’s greyed out (there’s nothing saved to go back to).
AI Tools
The AI button is a drop-down of image tools that run entirely on your PC —
nothing is uploaded. Each tool works on the active tab and opens its result as
a new tab (your original is left untouched), named so you can tell them apart
(…_upscaled, …_resized, …_nobg, …_straightened). A spinner shows while it
works.
| Tool | What it does |
|---|---|
| Upscale 2× / 4× (AI) | Enlarges using AI super-resolution, inventing detail for sharper results than a plain resize. Best for photos and detailed art. |
| Upscale 2× / 4× (Lanczos) | A fast, high-quality classic resize. It does not add new detail, but it’s quick and works on any PC. |
| Remove Background | Automatically cuts out the main subject and makes the background transparent, opening the result as a new PNG tab. |
| Straighten & Crop Photograph | Flattens a photo of a print, document, or whiteboard shot at an angle — detects the edges, lets you fine-tune the four corners, and opens the perspective-corrected result as a new tab. |
Which upscale should I use?
- AI gives the crispest enlargement but needs a graphics card (any modern built-in/integrated GPU is fine). It is not available over Remote Desktop or in a virtual machine, and needs up-to-date graphics drivers.
- Lanczos works everywhere (no GPU needed) and is nearly instant. Use it when AI upscale isn’t available or you just want a clean, larger copy.
If a tool can’t run on your machine, it tells you why rather than failing silently.
Straighten & Crop Photograph
Took a photo of a print, document, or whiteboard at an angle? This tool flattens
it into a clean, square-on image. You fit a box to the four corners of the item,
and Peashell removes the perspective distortion, opening the corrected result as a
new tab (…_straightened).

-
Draggable corners — Peashell auto-detects the photo’s edges and draws a box. Drag any corner to fit it exactly; a magnifier appears while you drag for precise placement.
-
Live preview — shows the flattened, perspective-corrected result and updates as you adjust the corners.
-
Adjust buttons — Re-detect (try auto-detection again), Use full image (reset the box to the whole photo), and Rotate 90°.
-
Aspect — keep the photo’s true proportions with Auto, or force a standard print ratio (3:2, 7:5, 4:3, 5:4, Square).
-
Apply — opens the straightened photo as a new tab.
-
Open the photo as a tab, then choose AI → Straighten & Crop Photograph…
-
Peashell auto-detects the four corners and draws a blue box over them. The right-hand panel shows a live preview of the flattened result.
-
Drag any corner to fine-tune it. A magnifier appears while you drag, so you can place each corner precisely on the edge; the preview refreshes when you let go.
-
Use the toolbar buttons as needed: Re-detect (try auto-detection again), Use full image (reset the box to the whole photo), and Rotate 90°.
-
Choose an Aspect ratio: Auto keeps the photo’s true proportions with no stretching, or force a standard print size — 3:2 (4×6), 7:5 (5×7), 4:3, 5:4 (8×10), or Square.
-
Click Apply to open the straightened photo as a new tab.
Auto-detect is a best guess. On low-contrast or glossy photos it may not land exactly on the edges — just drag the corners into place (the magnifier helps), or click Use full image and adjust from there.
Opening PNGs by Double-Clicking (File Association)
You can make Windows open .png files in Peashell when you double-click
them in File Explorer. Double-clicked files open as a new tab in the single
running window — it won’t launch a second copy of the app.
Because the operating system controls which app owns a file type, this is a one-time setup. Click the ⚙ settings button in the toolbar:
-
Windows: Peashell registers itself as a PNG handler and opens
Settings → Default apps. Choose Peashell as the default for
.png. - macOS: the button opens a short guide to setting default apps on Mac, since macOS sets default apps through Finder’s Get Info rather than from inside the app.
After that, double-clicking a PNG opens it straight into the editor.
Multiple Files & Tabs
-
Opening several images at once (multi-select in the Open dialog, or
double-clicking multiple files) gives each tab its real filename. Duplicate
names get a
(2)suffix so they stay distinct. - Save always targets the correct original file for the active tab, even with many tabs open.
- Use the Files menu to jump between open documents or to reveal any saved file in Explorer.
Closing the App
- If you have unsaved changes, closing the window shows a “Close Peashell?” confirmation (Cancel / Close Anyway).
- If nothing is open, or your documents have no unsaved edits, the window closes immediately with no prompt.
Note: Photopea’s own “reopen last documents on launch” feature is not available in this wrapper (a side effect of enabling Photopea’s embedding API). Save your work before closing.
Troubleshooting
The editor area is blank or won’t load.
The app needs internet access to www.photopea.com. Check your connection, VPN,
or any proxy/firewall that might block it, then relaunch.
Double-clicking a PNG doesn’t open it in the app (or opens something else).
Click the ⚙ settings button and set Peashell as the default .png app. On
Windows this opens Settings → Default apps (Windows requires this confirmation
manually); on macOS it opens a
guide to setting default apps on Mac.
“Show in folder” is greyed out in the Files menu. That document hasn’t been saved to disk yet. Use Save As first; then the folder icon will reveal it.
AI → Upscale (AI) says it can’t run / failed. AI upscale needs a working graphics card (Vulkan). This is normal in Remote Desktop sessions or virtual machines, or with very old/missing graphics drivers. Update your graphics drivers, or use Upscale (Lanczos) instead — it runs on any PC.
I moved the app folder and file associations broke. Just launch the app once from its new location — it re-registers itself automatically.
Where are the logs?
Runtime logs are written to %APPDATA%\Peashell\. They’re recreated
fresh on launch and are useful when reporting a problem.
Quick Reference
-
Run: unzip →
Peashell.exe(portable, no installer). - Needs internet (hosted editor).
- Save = overwrite original · Save As = new file · Export = PNG/JPG/WEBP/SVG copy.
- Revert = discard unsaved changes, reload the active tab from its saved file.
- Right-click Open = recent files (last 12).
- Files menu = switch tabs / reveal in Explorer.
- AI = Upscale (AI needs a GPU · Lanczos works anywhere) + Remove Background + Straighten & Crop Photograph; runs on-device, opens a new tab.
- ⚙ = set as default PNG editor (Windows: Settings → Default apps · macOS: how-to guide).