Mocha-Trace User Manual
Version 1.1.19
Image to SVG Tracing Workbench, plus a complete print-and-cut toolkit
Created by Chipp Walters, Altuit, Inc.
Support: https://cw1.me/discord
Overview
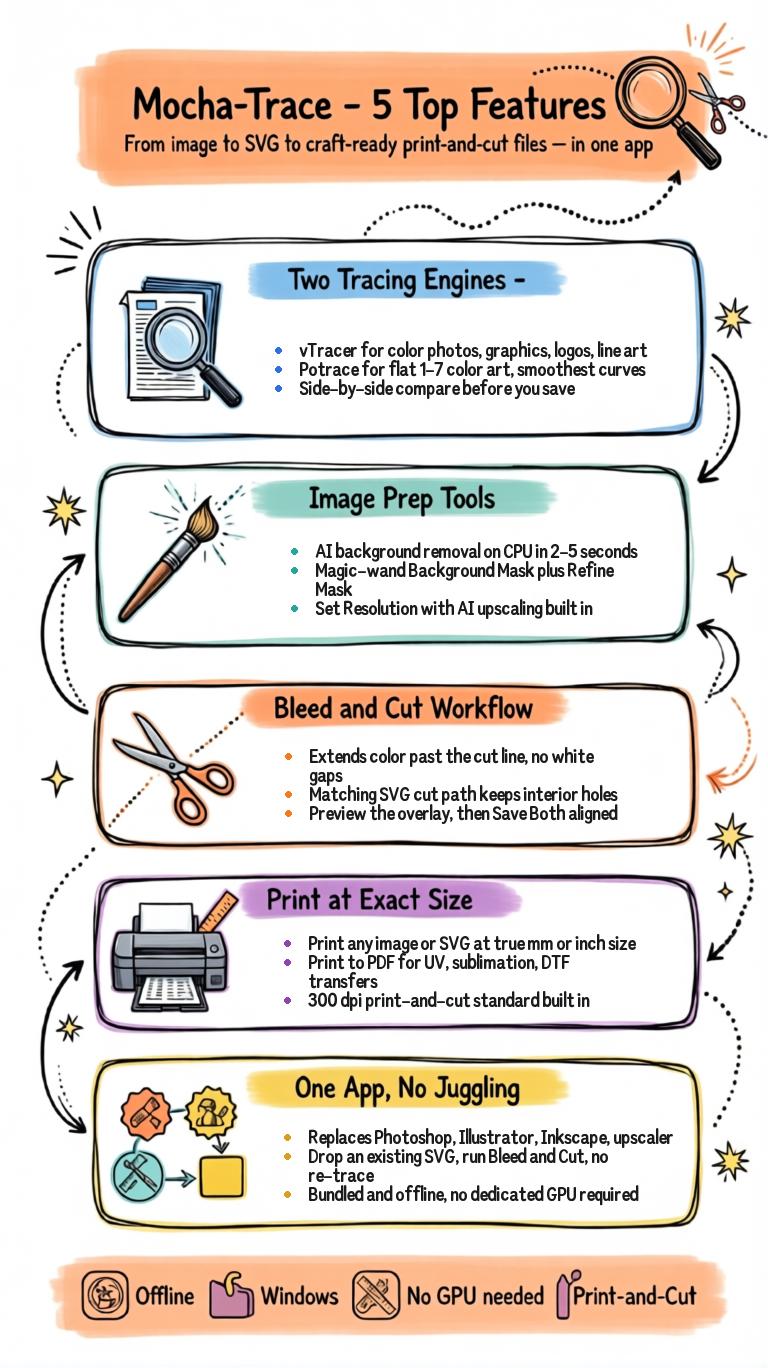
Mocha-Trace is a desktop application for converting raster images (photographs, graphics, line art) into scalable vector graphics (SVG), plus a complete toolkit for preparing artwork for print-and-cut workflows.
What you get:
- Two tracing engines — vTracer (color) and Potrace (flat-color)
- Image preparation — Mirror, Flatten, AI Background Removal, interactive Edit Mask, Refine Mask, Set Resolution (with AI upscaling), Save
- Non-destructive editing — every image edit is undoable with Ctrl+Z
- Vector cleanup — Simplify Paths reduces node count and optionally smooths tracer output before cutting
- Print-and-cut tools — Add Bleed, Generate Cut Path, both from vector or directly from a transparent image
- Print at exact physical size — Send any image or SVG to a printer (or Print-to-PDF) at its declared mm/in dimensions
- Standalone SVG workflow — Drop an SVG you already have and run Bleed + Cut without re-tracing
A side-by-side compare view makes it easy to evaluate trace results before saving.
System Requirements
| Requirement | Minimum | Recommended |
|---|---|---|
| OS | Windows 10 | Windows 11 |
| RAM | 4 GB | 8 GB |
| Disk | 500 MB | 1 GB |
| GPU | Any modern integrated GPU (Vulkan-capable) | Same — no dedicated GPU required |
Mocha-Trace is a standalone application with everything bundled — Python environment, vTracer, Potrace, the rembg background-removal model, and the Real-ESRGAN upscaler. No additional software installation is required.
Background Removal runs on the CPU. Set Resolution upscaling runs on the GPU via Vulkan — any modern integrated GPU (Intel/AMD) qualifies, so you do not need a dedicated graphics card.
Installation
Download and run the Mocha-Trace installer, or unzip the portable distribution. The app is ready to use immediately — all dependencies are bundled.
Getting Started
Launch Mocha-Trace from the Start Menu, desktop shortcut, or by running the executable directly.

Note: The screenshot above is from an earlier release and doesn’t show the Close All and Open SVG buttons in the toolbar, the Save / Print icons in panel headers, or the per-panel hamburger menus. The current UI is described in detail in the The Interface section below.
The very-first launch
You’ll see an empty workbench with a single large drop zone. You can:
- Drag an image or SVG anywhere onto the drop zone
- Click “Open Image” to pick a raster image from disk
- Click “Open SVG” to load an existing SVG and skip the tracing step
Quick start — image to SVG
- Open an image — Click Open Image or drag a file onto the workbench.
- Select a pipeline — Choose vTracer or Potrace from the left sidebar.
- Pick a preset (optional) — Choose a preset from the dropdown, or tweak the sliders.
- Run — Click the green Run button.
- Compare — The Original appears on the left; the SVG result on the right.
- Save — Click the Download icon in the Result panel header.
Supported file formats
| Type | Formats |
|---|---|
| Raster (Open Image) | PNG, JPG/JPEG, BMP, TIFF, WebP |
| Vector (Open SVG) | SVG |
WEBP and TIFF images are automatically converted to PNG before tracing.
The Mocha Bleed & Cut Workflow — End-to-End
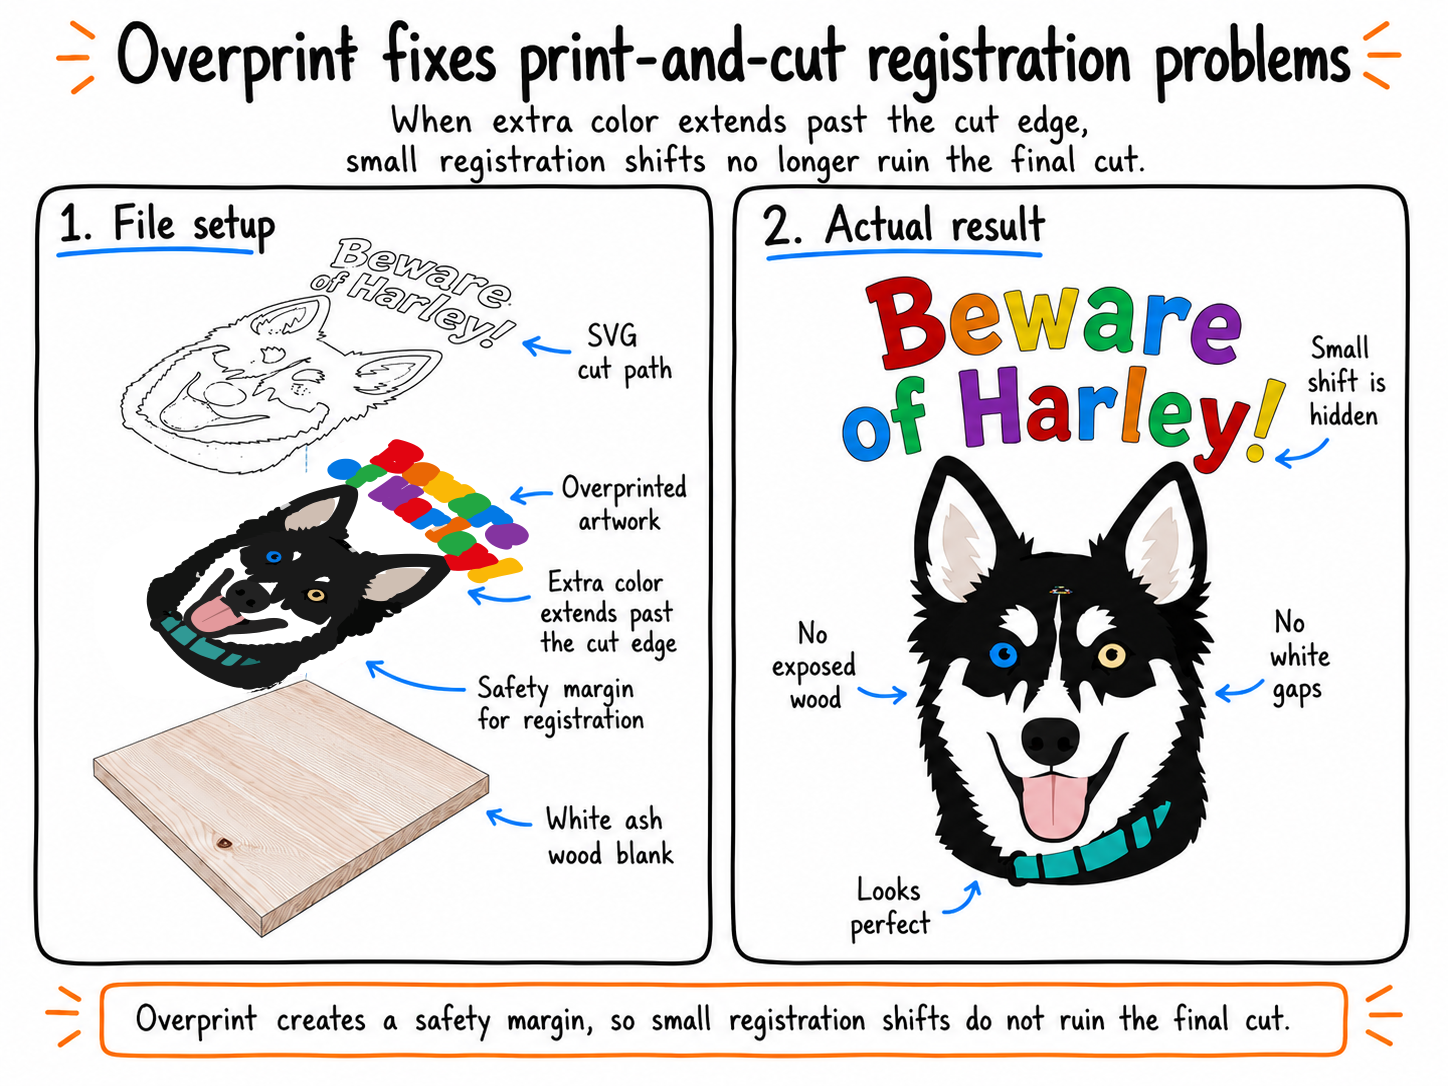 This is the showcase workflow Mocha-Trace was built around: turning AI artwork, logos, or any digital design into two craft-ready production files — a printable image with extra color around the edges, and a matching SVG cut path. Together they give you cleaner full-color laser-cut crafts with no white gaps when the print and the cut don’t line up perfectly.
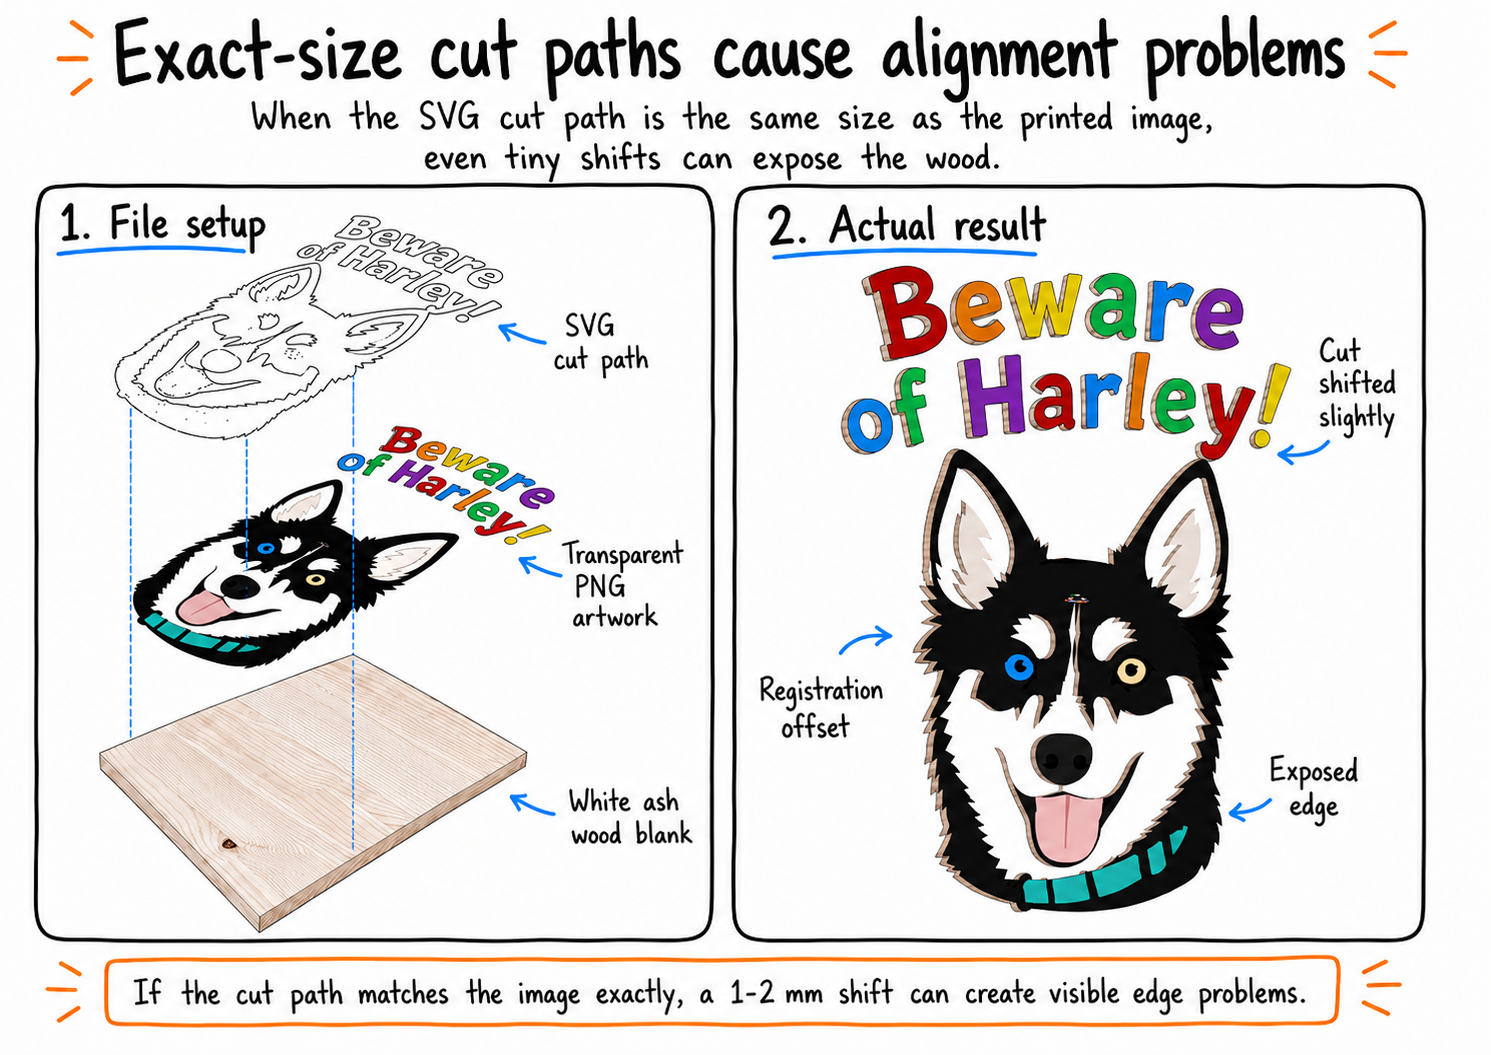
Why it matters
When the print and the cut path are exactly the same size, a tiny registration shift exposes the material underneath — white edges on a printed ornament, raw wood around a sign, a halo of unfinished material on a sticker. Mocha-Trace extends the artwork’s color slightly past the cut line so small alignment errors are hidden instead of ruining the piece.
You print the color-extended version. You cut the original shape. You get cleaner crafts.
Five steps from artwork to craft-ready files
1. Load your artwork
Open the source image — an AI render, a logo, a sign design, a photo, any raster file you want to turn into a craft piece.
| You have | What to do |
|---|---|
| A PNG with transparency already | Open Image (or drag it onto the workbench) — you can skip straight to step 2 |
| A JPG or opaque PNG | Open Image, then Original hamburger → Remove Background to isolate the subject |
The Remove Background entry uses bundled AI (rembg / isnet-general-use). It runs on CPU in 2–5 seconds for a typical 1080p image — no dedicated GPU needed. For graphic-design composites with a uniform background where the AI misses text or hard shapes, use Edit Mask instead (interactive magic-wand + brush). Both leave a transparent-background PNG ready for bleed.
2. Set the final size and resolution
Decide how big the finished craft piece will be (e.g., a 4-inch ornament) and pick a printing resolution (300 dpi is the print-and-cut standard).
Open Original hamburger → Set Resolution… and enter:
- Width in inches (with aspect-ratio locked so height follows)
- DPI at 300 (or whatever your printer prefers)
Mocha-Trace picks the resampling engine automatically:
| Situation | What happens |
|---|---|
| Your target is bigger than the source pixel count | AI super-resolution (Real-ESRGAN x4plus + Lanczos refine). 5–30 seconds. |
| Your target is smaller | Lanczos downscale. Instant. |
| Your target matches the source exactly | Just rewrites the DPI metadata. Instant. |
You stay in the app for upscaling — no jumping to a separate upscaler tool. Click Apply and the working image is replaced at the new size. The panel header updates to show the new pixel + physical dimensions.
3. Create the extra color edge (Add Bleed)
With the image at its final size, open Original hamburger → Add Bleed….
In the dialog:
- Set the Bleed amount — typically 2 mm or 1/8 inch. This is how far past the cut line the color extends.
- Confirm “Also save cut path (preview before saving)” is checked (it’s on by default).
- “Flip cut path horizontal (mirror)” is on by default. Leave it on for the usual heat-transfer workflow (where the print is mirrored and the cut needs to match the transferred artwork). Turn it off if your print isn’t mirrored or your cutter mirrors for you. In the preview you’ll see the cut mirrored relative to the print — that’s expected.
- Click Preview….
A few seconds later the Preview Bleed + Cut dialog opens. You’ll see:
- The printable image with the color extended past the artwork’s edges
- The cut path overlaid in red
- A slider to control the overlay opacity so you can see how the cut sits inside the colored area
Verify the colored band is visible around every edge — including interior cutouts (eyes, letter bowls, gaps inside shapes) — and that the red cut line follows the original artwork shape.
4. Save the matching files
If the preview looks right, click Save Both in the preview dialog and pick a destination. Or click Save and Print to save both files and immediately open the print dialog for the bleed PNG at its exact physical size.
Two files are written side-by-side:
-
<name>.png— the printable image with the color safety margin (this is what your printer prints) -
<name>_cut.svg— the matching cut path (this is what your laser cuts)
The two files are mathematically aligned at the same physical size, so when you load them into your craft workflow they overlay perfectly.
After saving from the image-source Add Bleed, the cut path SVG also loads into the Result panel so you can inspect it, simplify it, or print it without re-opening the file.
5. Print or export
- Print directly from Mocha-Trace — click the Printer icon on the Original panel header. The print dialog opens with the page sized to the artwork’s exact physical dimensions. Pick any installed printer, or pick Microsoft Print to PDF to save a PDF copy at exact physical size for a UV printer, sublimation, DTF, transfer paper, or any other production setup.
- Or export the files — the saved bleed PNG and cut SVG are standard files. Import them into Lightburn, Trotec, RetinaEngrave, your UV printer’s RIP, Affinity Designer, or any cutter / printer workflow that takes PNGs and SVGs.
The output, in summary
| File | Purpose |
|---|---|
| Bleed PNG | What you print. Color extends past the cut line so small registration drift doesn’t leave white gaps or raw material. |
| Cut SVG | What you cut. Single outline of the original artwork shape with interior holes preserved (laser still cuts out letter bowls, eyes, gaps). |
When to use the vector-source path instead
The five-step workflow above starts with a raster image. If you already have a clean SVG, you can use the same Bleed & Cut tools without re-tracing:
- Open SVG (or drag an SVG onto the workbench)
- If the SVG has no declared physical size, the Set Resolution dialog opens automatically — pick a size
- Result hamburger → Add Bleed… — same preview + Save Both flow
This is useful when you’ve prepared the vector shape in Illustrator / Inkscape / Affinity and just need Mocha-Trace’s bleed + cut output.
Who this workflow is for
- Laser cutter owners making signs, ornaments, tags, plaques, decorations, product cutouts
- Full-color craft makers printing or transferring color art onto wood, acrylic, leather, paper, fabric
- AI artwork users turning Midjourney / Stable Diffusion / similar output into physical products
- Etsy sellers and small-batch product makers trying to cut setup time and reduce wasted blanks
- UV printer / sublimation / DTF / waterslide users who need the image and matching cut path prepared together
- Designers who don’t want to fight multiple apps — Mocha-Trace replaces the “Photoshop for background removal, Illustrator for resize, Topaz for upscale, Inkscape for cut path, separate utility for bleed” stack with one focused tool
For the underlying details — what each setting in the Add Bleed dialog does, the math behind the bleed, what the cut path’s interior holes look like — see the Add Bleed + Cut Path workflow section later in this manual.
The Interface
The window has three main areas:
Top toolbar
| Button | Action |
|---|---|
| Close All | Clears the loaded image and result, returns to the empty drop zone. Disabled when nothing is loaded. |
| Open Image | Opens a file picker for raster images. |
| Open SVG | Opens a file picker for SVG files. The SVG loads directly into the Result panel (no tracing step). |
| Image info | Shows the source file’s pixel dimensions, format, and size. |
| Zoom dropdown | Fit, 25%, 50%, 75%, 100%, 150%, 200%, 500%. Controls both panels together. |
| Preferences / Help | Top right — theme settings and About screen. |
Left sidebar
- Pipeline selector — vTracer or Potrace.
- Preset dropdown — Quick-select setting combinations. Changes with the active pipeline.
- Settings panel — Pipeline-specific sliders and toggles. Every label has a hover tooltip with a plain-language explanation.
- Run button — Runs the selected pipeline. Shows a status message during processing.
Workbench layout — what appears when
The workbench adapts to what you’ve loaded:
| State | Layout |
|---|---|
| Nothing loaded | Single large drop zone — accepts both images and SVGs |
| Image loaded, no trace yet | Single-panel — only the Original panel, full-width |
| Trace running or trace result exists | Two-panel — Original + Result side-by-side |
| Standalone SVG loaded (via Open SVG) | Single-panel — only the Result panel |
This means: simply loading an image does not open an empty Result panel. The Result panel only appears once you click Run (or already have a result).
Panel headers
Both panels have a header with:
| Element | Action |
|---|---|
| Title | “Original” or the pipeline name (“vTracer” / “Potrace”) / the loaded SVG’s filename |
| Size badge | Click to toggle between mm and in display. Hover for the full breakdown (pixels, DPI, mm, and in). |
| Download icon | Saves the panel’s content — image or SVG — to a file you choose. |
| Printer icon | Sends the panel’s content to the system print dialog at its declared physical size. Choose any printer or “Microsoft Print to PDF” for a PDF copy at exact size. |
| Hamburger menu | Image editing (Original) or vector editing (Result). See sections below. |
Status bar (footer)
- File path — Full path to the currently loaded file (hover for the full path if truncated).
- App name — “Mocha-Trace”
- View Log — Click to open the log viewer. Shift+Click toggles DevTools.
- Version — Current app version.
Tracing Pipelines
vTracer
Best for: Most images — photographs, graphics, logos, line art, pixel art.
Runs the vTracer engine directly on the input image. The most versatile pipeline; gives you full control over all tracing parameters.
How it works:
- Analyzes color distribution
- Creates stacked (or cutout) color layers based on the Gradient Step setting
- Fits curves (spline, polygon, or pixel) to layer boundaries
-
Outputs an SVG with one
<path>per color region
Typical speed: under 2 seconds.
Potrace
Best for: Flat-color graphics — logos, line art, stamps, icons, simple illustrations with 1–7 distinct colors.
Per-color pipeline: the image is quantized to your chosen palette size, each color is traced as its own B&W Potrace layer, and the layers are stacked into a single SVG with the right colors.
How it works:
- Quantizes to 1–7 colors. Transparent regions get their own internal slot so they never steal from your color budget.
- Builds a 1-bit mask per color
- Traces each mask with Potrace
- Stacks the paths into one SVG with each color’s fill
Remove Background — When checked, the most common corner-sampled color in the palette gets detected and that layer is skipped. Useful for solid-color and dark backgrounds.
When to use over vTracer: flat-color artwork with a small palette where you want the smoothest curves and the smallest files.
Typical speed: under 2 seconds.
vTracer Settings
The vTracer settings panel exposes every parameter from the engine. Every label has a hover tooltip.

- Color Mode — B/W or Color.
- Hierarchical — Cutout (jigsaw) or Stacked (overlapping layers).
- Filter Speckle — Removes regions smaller than this size.
- Color Precision — How precisely colors are matched (1–8 bits).
- Gradient Step — The most important setting. Controls color layer count.
- Curve Fitting — Pixel, Polygon, or Spline.
- Corner Threshold — How sharp corners are handled.
- Remove Background — Strips the corner-sampled background color.
- Downscale images > 2K — Auto-downscales large sources before tracing.
Clustering
| Setting | Options | Description |
|---|---|---|
| Color Mode | B/W, Color | Color preserves all colors. B/W is good for line art, text, sketches. |
| Hierarchical | Cutout, Stacked | Stacked: overlapping layers (recommended). Cutout: jigsaw-fit (can hide small colored areas). |
Sliders
| Setting | Range | Default | What it does |
|---|---|---|---|
| Filter Speckle | 1–128 | 4 | Removes regions smaller than this. Higher = cleaner with less noise. |
| Color Precision | 1–8 | 6 | Color match precision. 8 = most accurate. |
| Gradient Step | 1–128 | 16 | THE MOST IMPORTANT SETTING. Lower = more layers = more detail. Try 6–12 for photos, 16–32 for graphics. |
| Corner Threshold | 0–180 | 60 | Lower = sharper corners. Higher = smoother. Low (15–30) for mechanical, higher (60–90) for organic. |
| Segment Length | 0–100 | 4.0 | Minimum curve segment length. Higher = simpler curves. |
| Splice Threshold | 0–180 | 45 | Higher = more segments merge. |
Curve Fitting
| Mode | Best for |
|---|---|
| Pixel | Pixel art, retro graphics |
| Polygon | Mechanical objects, architecture, hard surfaces |
| Spline | Photos, organic shapes, illustrations |
Downscale images > 2K
On by default. Sources larger than 2048 px on the longest axis are downscaled before tracing for speed and cleaner output. This does not affect Add Bleed or Generate Cut Path — the trace output declares the source’s true physical size so downstream operations measure correctly regardless of downscale.
Potrace Settings

| Setting | Range | Default | What it does |
|---|---|---|---|
| Number of Colors | 1–7 | 2 | Palette size for quantization. |
| Remove Background | — | off | Detects the corner-sampled background color and skips that layer. |
| Downscale images > 2K | — | on | Same behavior as the vTracer setting. |
Number of Colors
| Value | Result | Best for |
|---|---|---|
| 1 | Pure black & white | Line art, stamps, text, signatures |
| 2 | Two color layers | Simple logos, icons, stencils (default) |
| 3 | Three color layers | Simple illustrations, badges |
| 4 | Four color layers | More complex flat graphics |
| 5 | Five color layers | Detailed flat-color art |
| 6 | Six color layers (“Detailed” preset) | Multi-color illustrations |
| 7 | Seven color layers (“Extra Detailed” preset) | Maximum — watch for quantization noise |
Potrace produces the cleanest results at 1–2 colors. Higher counts work but vTracer may be better for more than 3 colors.
Presets
vTracer Presets
| Preset | Color Mode | Gradient Step | Curve Fitting | Corner | Use Case |
|---|---|---|---|---|---|
| Photo - High | Color | 6 | Spline | 60 | Maximum detail photographs |
| Photo - Medium | Color | 16 | Spline | 60 | Balanced photo quality |
| Photo - Low | Color | 48 | Spline | 60 | Posterized, small files |
| Graphics - Color | Color | 16 | Spline | 60 | Logos, icons, illustrations |
| Graphics - B/W | B/W | 16 | Spline | 60 | Monochrome sketches |
| Line Art - Clean | B/W | 16 | Polygon | 90 | Sharp line drawings |
| Cutout - Flat | Color | 16 | Spline | 60 | Non-overlapping regions |
| Hard Surface | Color | 12 | Polygon | 30 | Mechanical, sharp edges |
| Pixel Art | Color | 8 | Pixel | 90 | Retro pixel graphics |
When you modify a slider after picking a preset, the dropdown shows “Custom”.
Potrace Presets
| Preset | Colors | Use Case |
|---|---|---|
| Monochrome | 1 | Line art, logos, stamps |
| Two-Tone | 2 | Simple graphics, icons (default) |
| Flat Color | 3 | Simple illustrations |
| Multi-Color | 4 | More complex graphics |
| Rich | 5 | Maximum detail at 5 colors |
| Detailed | 6 | 6 color layers |
| Extra Detailed | 7 | Maximum — 7 color layers |
Image Editing — the Original panel hamburger menu
The hamburger menu on the Original panel’s header is your image-editing toolbox. Every operation writes a new temp PNG and swaps it in as the working image, so downstream operations (trace, bleed, cut, print) automatically use the edited result.
Undo (Ctrl+Z)
Image edits are non-destructive and undoable. The top menu item shows the most recent edit (e.g. “Undo Remove Background”) and restores the image to its state before that edit. Ctrl+Z does the same from anywhere in the app. The undo history stacks multiple edits, so you can step back through Mirror, Flatten, Edit Mask, Refine Mask, Set Resolution, and Remove Background one at a time. Opening a new file clears the history.
Mirror Image
Toggle: flips the working image horizontally. The flip is committed to the working file, so a subsequent vTracer / Potrace / Bleed / Cut / Save all see the mirrored pixels. Toggling twice returns to the bit-identical original.
The DPI metadata is preserved through the flip.
Remove Background…
AI background removal via the bundled rembg model (isnet-general-use). Produces a transparent-background RGBA PNG, replaces the working image with it.
The dialog offers one option:
- Fill interior holes (on by default) — the AI occasionally punches a hole through the subject (e.g. wood grain or sky showing through a gap that should stay opaque). When on, fully-enclosed transparent regions inside the subject are filled back to opaque so only the true outer background is removed. Turn it off if your subject legitimately has see-through interior gaps you want to keep.
Typical inference: 2–5 seconds for a 1080p image on CPU. Runs on any modern integrated GPU as a bonus speed-up.
The model handles general subjects well — people, products, animals. For flat graphic-design composites (logos, text on a solid color) where the AI misses hard-edged shapes, use Edit Mask instead. Use Flatten Image afterward if you’d rather have a solid background than transparency, or Refine Mask to tighten fuzzy edges.
Edit Mask…
An interactive, manual background remover for cases where AI segmentation struggles — uniform-background composites, logos, text, hard-edged graphics. Opens a full-screen masking dialog with three tools that share one editable operation stack:
| Tool | Action |
|---|---|
| Magic Wand | Click a pixel to flood-fill a selection by color similarity. Tolerance controls how close colors must be to be included. Contiguous (on by default) limits the fill to the connected region under the cursor; turn it off to select every matching color across the whole image. |
| Brush | Drag to paint area into the removed (transparent) selection by hand. |
| Eraser | Drag to restore (un-remove) area back to opaque. |
The selection shows as a translucent red tint over the source. Brush and eraser strokes paint in this same red live as you drag — the brush adds red, the eraser knocks it back out — so you see exactly what you’re selecting before you release the mouse. Use the eye toggle to hide/show the overlay and check the result. Brush / Eraser size is set with the bracket keys — [ shrinks, ] grows — and a circular cursor ring previews the size at the current zoom. Undo (Ctrl+Z) pops the last operation off the stack, so wand clicks and brush strokes can each be backed out individually. Click Apply to commit the masked result as the new working image.
The dialog supports the same mouse-wheel zoom (centered on the cursor) and drag-pan as the main panels, so you can zoom in tight to clean up edges.
Refine Mask…
Cleans up the soft, semi-transparent halo that AI background removal leaves around edges so the bleed pipeline gets a clean binary edge to extend. Two controls:
- Threshold (0–255, default 200) — alpha values above this snap to fully opaque, below it snap to fully transparent. Raising it trims more of the fuzzy fringe.
- Erode (0–10 px, default 1) — shrinks the opaque region inward by this many pixels, eating away any remaining halo ring.
Refine Mask only expands inward — it never grows the shape outward (that’s what Add Bleed is for). The menu item is enabled only when the working image has a transparent background.
Flatten Image…
Composites the image onto a solid background color you pick. Useful for:
- Forcing transparent areas to a specific color (e.g., white background for a JPG export)
- “Burning in” a checkered preview before save
The dialog lets you pick any hex color.
Set Resolution…
Resamples the working image to a target physical size at a chosen DPI. The dialog gives you:
- Width / Height in px / mm / in (with aspect-ratio lock)
- DPI for the output
- A clear hint badge when the target is larger than the source — AI super-resolution will be used
How the engine is chosen automatically:
| Target vs source | Engine | Speed |
|---|---|---|
| Larger (any axis) | AI super-resolution (Real-ESRGAN x4plus + Lanczos refine) | ~5–30 seconds |
| Smaller | Lanczos | Instant |
| Exact same pixel count | DPI metadata only (no resampling) | Instant |
The AI engine maxes out at 4× the source. The dialog blocks larger targets with a clear error.
After resampling, the image badge shows the new pixel and physical dimensions. The output is at your chosen DPI, which Add Bleed, Generate Cut Path, Print, and Save all measure from.
Add Bleed…
Generates a print-ready PNG with the artwork’s edge colors extended outward into a transparent border, and (by default) a matching laser cut-path SVG.
The dialog (image-source mode):
- Bleed amount in mm / in / px
- Image size readout at the source’s native DPI
- Output dimensions preview
- Also save cut path (preview before saving) — when on (default), opens the Preview Bleed + Cut dialog after generation; when off, saves the bleed PNG only
- Flip cut path horizontal (mirror) — on by default, shown only when “Also save cut path” is on. Mirrors the cut path left-to-right relative to the printed bleed. This matches the common heat-transfer workflow where the print is mirrored so it can be transferred onto the substrate, while the cut needs to match the transferred (un-mirrored) artwork. Turn it off if your cutter already mirrors for you, or if your print isn’t mirrored.
The bleed math runs at the source’s native resolution and DPI — no super-sampling, no quantization, no re-tracing.
The menu item is enabled only when the source image has a transparent background. Hover the disabled entry to see why.
See the Add Bleed + Cut Path workflow section below for the full preview/save flow.
Generate Cut Path…
Stand-alone laser cut-path SVG generated directly from the source image, with no bleed PNG. It traces the image’s transparency edge with Potrace at the image’s native resolution — there’s no DPI / rasterization setting, because the image is used as-is. The image’s embedded DPI is used only to stamp the output SVG’s physical size so it cuts at the right dimensions.
The dialog shows the image size and one option:
- Flip horizontal (mirror) — off by default. Mirrors the cut path left-to-right, for the same heat-transfer reason described under Add Bleed above.
The menu item is enabled only when the source image has a transparent background (the transparency is what defines the cut edge).
If you want a bleed PNG and a matching cut SVG in one pass, use Add Bleed… with “Also save cut path” instead.
Vector Editing — the Result panel hamburger menu
When the Result panel has an SVG (from a trace pipeline or via Open SVG), its hamburger menu has:
Mirror Image
Flips the SVG horizontally (visual toggle).
Set Resolution…
Re-scales the SVG to a target physical size at a chosen DPI. The dialog defaults to the SVG’s currently-declared physical dimensions, so if you opened the dialog after tracing a 4-inch-wide image, the dialog opens at 4 inches.
This works on:
- SVGs from a trace pipeline (uses the source image’s pixel dims as the user-space coordinate space)
- Standalone SVGs (uses the SVG’s viewBox)
- viewBox-only SVGs (auto-opens this dialog on load so you can assign a physical size before Bleed/Cut)
Add Bleed…
Generates a print-ready bleed PNG + (optional) laser cut path from the SVG. Same flow as the image-source Add Bleed but from a vector source. See the Add Bleed + Cut Path workflow section.
The dialog adds DPI and Clean Specks controls because vector-to-raster conversion can produce small quantization artifacts that benefit from a cleanup pass. It also has the same Flip cut path horizontal (mirror) option (on by default) as the image-source Add Bleed.
Generate Cut Path…
Stand-alone laser cut path generation. Outputs an SVG with a single outer outline (plus interior holes for letter bowls, eyes, etc.) that a laser cutter can use directly.
The dialog has a DPI control (higher = more precise silhouette tracing) and a Flip horizontal (mirror) option (off by default) that mirrors the cut path left-to-right for mirrored-print heat-transfer workflows.
If you want a bleed PNG and a cut SVG that line up, use Add Bleed with “Also save cut path” enabled instead — it generates both in one pass and lets you preview them overlaid.
Simplify Paths…
Reduces the node count of an SVG and optionally smooths its curves — ideal for trimming noisy tracer output before laser cutting. Opens a full-screen iterative editor with a live preview:
- Tolerance (0–10) — how aggressively to drop nodes. Higher removes more points and flattens fine detail. The preview updates as you drag.
- Smooth output — when on, rebuilds the simplified paths as quadratic Bézier curves (soft, rounded edges). When off, leaves straight polyline corners sharp.
- Apply — commits the current preview as a stage and keeps the dialog open so you can run another pass on top (e.g. a high-tolerance pass to kill noise, then a smoothing pass). Each stage stacks.
- Undo (Ctrl+Z) / Reset — step back one stage, or discard all stages and return to the original.
- Show Original — A/B toggle to compare the simplified result against the untouched input.
A live node-count readout (original → current nodes, with reduction %) shows how much you’ve trimmed. Done ships the simplified SVG back to the Result panel; Cancel discards everything. The dialog has the same cursor-centered zoom and pan as the other panels.
Add Bleed + Cut Path workflow
This is the print-and-cut workflow that lets you produce both:
- A bleed PNG — the artwork with edge colors extended past the cut line, so any laser registration drift still produces a clean print
- A cut path SVG — a single outline that the laser cuts, preserving interior holes (letter bowls, eyes, etc.)
Where it lives
- Original panel hamburger → Add Bleed… — Operates on the source image’s alpha channel directly (no trace step). Use this when you have a transparent-background PNG and want the cleanest possible bleed.
- Result panel hamburger → Add Bleed… — Operates on the SVG. Use this when you’ve traced a non-transparent source and want the vector-clean silhouette.
How it works
- Open Add Bleed from the appropriate panel
- Choose your bleed amount (typical: 2 mm or 1/8 inch)
- Confirm “Also save cut path (preview before saving)” is checked (it is by default)
- Click Preview…
- The Preview Bleed + Cut dialog appears with the bleed PNG and the cut path overlaid in red — drag the slider to control the cut overlay opacity. Mouse-wheel zoom (centered on the cursor) and drag-pan let you inspect the alignment closely.
- If it looks right, click Save Both and pick a save location — or click Save and Print to save both files and immediately open the print dialog for the bleed PNG
-
Two files are written:
<name>.png(bleed) and<name>_cut.svg(cut)
The Preview dialog can’t be dismissed by clicking the backdrop — it requires Cancel, Save Both, or Save and Print, because the temp files are cheap to regenerate but not free.
What the bleed actually does
The bleed extends edge colors into every transparent pixel within bleed_px of an opaque pixel. This includes interior cutouts (letter holes like B / e / o / a, eyes, gaps inside a wine glass, etc.) — exactly what you want for laser cutting, where the laser needs a registration safety margin everywhere it cuts.
What the cut path actually does
The cut path traces the artwork’s outer envelope as a single path. Interior holes are preserved as inner subpaths (even-odd winding) so the laser physically cuts those holes out instead of leaving them filled. Output is typically 1–5 KB.
When Flip cut path horizontal (mirror) is on, the whole cut is mirrored across its full footprint (including the bleed margin), so it stays registered 1:1 with a mirrored print. The flip lives in the saved SVG as a transform wrapping the paths — the coordinate space and physical size are unchanged.
Clean small color specks (vector-source Bleed only)
A connected-component filter that demotes tiny same-color regions (typically Potrace quantization artifacts like a green pixel cluster inside a blue region) so the bleed paints over them with the surrounding majority color. On by default. Image-source Bleed doesn’t show this — there’s no quantization step.
Open SVG and the Standalone SVG workflow
You don’t have to trace something to use Mocha-Trace’s print-and-cut tools.
Click Open SVG (or drag an SVG file onto the workbench) to load an existing SVG directly into the Result panel. The workbench switches to a single-panel layout — no Original panel — and you can:
- Set Resolution to assign a physical size
- Add Bleed to generate the bleed PNG + cut path
- Generate Cut Path as a standalone laser-cut file
- Print at exact physical size
viewBox-only SVGs
If your SVG only has a viewBox (no declared width/height in mm/in), Mocha-Trace automatically opens Set Resolution when you load it, with the viewBox dimensions pre-filled. Pick a physical size and Apply, then proceed with Bleed/Cut.
If your SVG already declares physical dimensions (e.g., width="100mm"), it loads ready to use — no extra step needed.
Save Image / Save SVG / Print
Save Image (Original panel)
The Download icon in the Original panel header saves the current working image — including any results from Mirror, Flatten, Remove Background, or Set Resolution — to a path you choose.
If you pick the same extension as the source, the file is copied byte-for-byte to preserve every metadata field. If you switch extensions (PNG ↔ JPG), sharp re-encodes with high quality and preserves the DPI tag.
Save SVG (Result panel)
The Download icon in the Result panel header saves the SVG to a path you choose. The saved file preserves all the physical width/height declarations so Inkscape, Illustrator, Lightburn, Trotec, and similar applications interpret the size correctly.
Print at exact physical size
The Printer icon (left of the hamburger on both panels) opens the system print dialog with the artwork sized to its declared physical dimensions:
- Image — page size = pixel dims ÷ DPI
-
SVG — page size = parsed
width/height(mm, cm, in, or px-at-96-dpi)
In the Windows print dialog you can pick any installed printer or Microsoft Print to PDF for a PDF copy at the exact intended physical size.
Image Resolution Guide
Higher resolution does not always mean better tracing results. There’s a point of diminishing returns, and AI-upscaled images can produce worse traces than the original.
Recommended source resolutions
| Image type | Ideal | Why |
|---|---|---|
| Logos & graphics | 1K–2K pixels | Clean edges; higher res adds anti-aliasing noise that gets traced as detail. |
| Photographs | 2K pixels | Good detail without excessive paths. 4K rarely improves SVG output. |
| Line art & sketches | 1K–2K pixels | Higher res = thicker traced lines with more edge paths. |
| AI-upscaled images | Use original | Upscaling artifacts (halos, sharpening noise) get faithfully traced as noise. |
Set Resolution vs Downscale > 2K
The two interact gracefully:
- Downscale images > 2K (settings panel) — pre-trace optimization. Larger sources get downscaled internally for trace speed and cleanliness. The output SVG still declares the source’s true physical size, so Bleed/Cut/Print/Save measure correctly.
- Set Resolution (hamburger menu) — explicit user-driven resample. Changes the actual working file’s pixel dimensions and DPI. Lower → Lanczos. Higher → AI super-resolution.
If you need a larger raster to drive a higher-DPI bleed/cut output, use Set Resolution. If you’re just tracing, leave Downscale > 2K on and trust the engine.
Viewing Results
Side-by-side comparison
When you have both an image and a trace result, the panels show side-by-side. Both zoom and pan together so you can compare exact regions at any zoom level.
Transparency grid
The Result panel and image previews display a Photoshop-style checkerboard behind transparent areas. Makes it obvious where the alpha is, especially after Remove Background.
Zoom controls
| Action | Effect |
|---|---|
| Mouse wheel | Zoom in/out centered on cursor |
| Click and drag | Pan (when zoomed in past Fit) |
| Right-click | Reset to Fit |
| Zoom dropdown | Pick a specific zoom level |
Zoom percentages are relative to the original image resolution.
Result statistics
The Result panel header shows:
- Physical size (mm or in — click the badge to toggle)
- Time — total processing time
-
Paths — number of
<path>elements - Size — SVG file size
Panel Size Badge — mm/in Toggle
The size readout in each panel header is clickable. Click to toggle between mm and in display. Default is mm. Both panels stay in sync — clicking one flips both. The setting resets to mm on app restart (it’s a view preference, not a saved setting).
Hover the badge for the complete breakdown: pixel dims, DPI, mm, and in.
MCP Server (AI Integration)
Mocha-Trace includes an MCP (Model Context Protocol) server so AI assistants like Claude can use the tracing tools directly.
Setup for Claude Desktop
Add the following to your Claude Desktop config (claude_desktop_config.json). Replace the path with the actual location of your Mocha-Trace install:
{
  "mcpServers": {
    "mocha-trace": {
      "command": "node",
      "args": ["<Mocha-Trace install path>/mcp-server/index.mjs"]
    }
  }
}
Available tools
| Tool | Description |
|---|---|
| list_presets | Lists all available tracing presets with settings |
| get_image_info | Returns image dimensions, format, and file size |
| trace_image | Converts a raster image to SVG via vTracer with full settings |
| trace_image_potrace | Converts a raster image to SVG via the per-color Potrace pipeline |
| capture_window | Captures a screenshot of the running app |
| click_element | Clicks a UI element by text label or CSS selector |
| load_image | Loads an image into the app by file path |
| execute_js | Executes JavaScript in the app renderer |
| query_ui | Lists all clickable UI elements with positions |
| app_status | Checks if the app is running |
Example prompts
- “Trace this image using the photo-high preset: D:\photos\landscape.jpg”
- “Trace this logo with 3-color Potrace: D:\graphics\logo.png”
- “What are the available tracing presets?”
Keyboard and Mouse Controls
| Input | Where | Action |
|---|---|---|
| Mouse wheel | Image panels | Zoom in/out (centered on cursor) |
| Left-click + drag | Image panels | Pan (when zoomed in) |
| Right-click | Image panels | Reset to Fit zoom |
| Drag-and-drop image | Empty screen / Original panel | Load / replace the image |
| Drag-and-drop SVG | Empty screen / Result panel | Load the SVG (no tracing) |
| Click size badge | Panel header | Toggle mm ↔ in |
| Ctrl+Z | Anywhere (image loaded) | Undo the last image edit |
| Ctrl+Z | Edit Mask / Simplify Paths dialog | Undo the last operation / stage inside the dialog |
[ / ] |
Edit Mask dialog | Shrink / grow the brush + eraser size |
| Escape | Any dialog | Close the dialog (same as Cancel) |
| Click | Help icon (?) | Open About |
Note: Clicking outside the Set Resolution or Add Bleed dialogs does not close them — those dialogs hold entered values that are easy to lose by mis-clicking. Close them via Cancel, X, Apply, or Escape.
Logging and Debugging
Click View Log in the status bar footer to open the log viewer. Logs include timestamped entries for:
- App startup/shutdown
- Image loading and edits
- Pipeline execution and timings
- Bleed/Cut/Print operations
- Errors and warnings
Log files are at %APPDATA%/Mocha-Trace/app.log.
Troubleshooting
Trace fails to run
Cause: The embedded Python environment may be corrupted or missing. Fix: Reinstall or re-extract Mocha-Trace from the original distribution.
Colors look wrong or appear grayscale
Cause: The source is WEBP or TIFF, which vTracer’s Rust engine doesn’t handle with full color. Note: Mocha-Trace auto-converts WEBP and TIFF to PNG before tracing. If you still see grayscale, the source itself may be grayscale.
Remove Background leaves some background areas
Vector-side (settings panel checkbox): The remaining areas are a slightly different shade. Fix: Raise Color Precision to 8 so vTracer groups similar colors tighter.
Hamburger-menu AI version: Most subjects work well. Hair or fur edges can be soft — run Refine Mask to threshold and erode the fuzzy halo into a clean edge. If the AI misses hard-edged shapes or text entirely (common with flat graphic-design composites), use Edit Mask to flood-fill the background by color and brush in any misses by hand. If the soft edges look bad against your target background, try Flatten Image afterward against a contrasting solid color. If the AI removed an interior region that should have stayed opaque, re-run Remove Background with Fill interior holes on.
Add Bleed / Generate Cut Path disabled on the Original panel
Cause: The source image is fully opaque (no transparent background). Bleed needs transparent pixels to paint into, and the cut path needs a transparency edge to trace. Fix: Run Remove Background (or Edit Mask) first, then Add Bleed / Generate Cut Path.
Set Resolution shows “Too large for AI upscale”
Cause: You asked for more than 4× the source pixel count. The bundled Real-ESRGAN model maxes out at 4×. Fix: Reduce target dimensions or DPI, or run Set Resolution twice in succession.
Set Resolution upscale takes a long time
Cause: AI super-resolution is computationally expensive — 5–30 seconds is typical on an integrated GPU. Note: The dialog shows a “AI upscale” hint badge with an estimated time before you click Apply.
Printed page is the wrong size
Cause: The print dialog may have been set to “Fit to page” or similar scaling. Fix: In the print dialog, choose “Actual size” or “100%” — Mocha-Trace sends the artwork sized to its declared physical dimensions; any printer-side scaling overrides that.
SVG looks different from the preview
Cause: Some SVG viewers render stacked/overlapping paths or transparency differently. Fix: Try opening in a web browser — Chromium renders SVG most faithfully to how Mocha-Trace previews it.
Image won’t load
Cause: Unsupported format or corrupted file. Supported: PNG, JPG, JPEG, BMP, TIFF, TIF, WebP (raster) and SVG (vector).
Save Image asks for a name but I want to overwrite
Behavior: Save Image always opens a dialog so accidental overwrites of original sources can’t happen. Type the original filename in the dialog and confirm the overwrite to overwrite.
Mocha-Trace is developed by Chipp Walters, Altuit, Inc.