[page-title: FLEX V2 Docs]
[home-url: https://cw1.me/chippwalterscom]
[superhive-url: https://superhivemarket.com/products/simple-scifi-pro]
[product-url: https://superhivemarket.com/products/simple-scifi-pro]
[use-toc: true]
SCIFI FLEX V2 User Manual
By Chipp Walters and Anthony Aragues
Introduction {#introduction}
Welcome to the SCIFI FLEX v2 addon for Blender 3.6+. This manual is designed to help you navigate through the installation, setup, and use of SCIFI FLEX v2 to enhance your 3D modeling workflow with powerful displacement and geometry generation tools.
Background {#background}
Well over a year ago, I did a spaceship tutorial using an app called JSplacement to create various grayscale displacement maps. The developer of the app was an artist and didn’t want anyone using maps created by his tool in a commercial way. Furthermore, he didn’t particularly like answering help questions and eventually ended up discontinuing the app altogether.
Meanwhile, I decided I would create a better displacement map generator in Blender that allows people to use the generated maps for anything they want, including selling them and commercial projects. That was the beginning of SIMPLE SCIFI. It generates grayscale maps in full 32-bit EXR format which allows for inclines, spheres, and cylinders to be displaced accurately– versus the 8-bit version that came with JS placement.
Along the way, I discovered that I could also easily generate the actual geometry in addition to the grayscale displacement map. And, being true geometry, it would render much faster. And that’s how SIMPLE SCIFI ended up having two different modes, one as a displacement map generator, the other as a geometry generator.
Anthony came along and added some python to simplify the geometry generation part of this and we called that addon FLEX.
This new release, combines both the displacement capabilities and the geometry generation capabilities into one add-on which we are calling FLEX v2. There are also many other features that have been added to make the workflow easier– not to mention adding compatibility modes to the ever-changing target that is Blender.
SCIFI FLEX v2: A Comprehensive Tool for 3D Artists {#scifi-flex-v2:-a-comprehensive-tool-for-3d-artists}
SCIFI FLEX v2 is an innovative addon for Blender 3.0+ designed to elevate the art of 3D modeling to new heights. It stands as a robust suite of tools that streamlines the process of creating and applying displacement maps and complex geometries to 3D models. With its user-friendly interface and a wide array of functionalities, SCIFI FLEX v2 enables artists, designers, and enthusiasts to bring intricate sci-fi designs to life with efficiency and precision.
Features at a Glance: {#features-at-a-glance:}
- Displacement Map Creation: Generate high-quality displacement maps that add unparalleled depth and detail to your models.
- Advanced Geometry Generation: Leverage geometry nodes to create intricate shapes and patterns that are both detailed and resource-efficient.
- DPACK Integration: Utilize pre-designed DPACKS for quick application or create your own packs for tailored effects and textures.
- Non-Destructive Workflow: Experiment with designs and adjust details without altering the original mesh, preserving the integrity of your model.
- Versatility: Whether you’re designing a sleek spaceship or a dystopian cityscape, SCIFI FLEX v2 provides the tools to realize your vision.
- Customization: Fine-tune settings within the generators to achieve unique distributions, densities, and appearances.
- User-Centric Design: Enjoy an addon that’s built with the user experience in mind, featuring intuitive controls and a clear, logical workflow.
Ideal for Diverse Projects: {#ideal-for-diverse-projects:}
SCIFI FLEX v2 is versatile enough to accommodate a range of projects, from quick concept mockups to complex, render-ready scenes. Its ability to handle the demands of high-detail modeling makes it a go-to choice for:
- Game Design: Create assets that are both visually impressive and optimized for game engines.
- Film and Animation: Bring a cinematic quality to your work with models that stand up to close-up shots and high-resolution renders.
- Visualization: Whether for architectural renders or product designs, add a layer of realism to your visualizations.
- Educational Purposes: Teach the principles of 3D modeling with an addon that demonstrates advanced techniques in a comprehensible manner.
A Partner in Creativity: {#a-partner-in-creativity:}
SCIFI FLEX v2 is more than just a tool—it’s a partner in the creative process, empowering you to push the boundaries of your imagination. It’s a testimony to the synergy between technology and art, where every function is crafted to inspire and every feature is developed to unleash the full potential of your creative prowess in the realm of 3D art.
Installation Guide for SCIFI FLEX v2 {#installation-guide-for-scifi-flex-v2}
Welcome to the exciting world of SCIFI FLEX v2, where your creative potential with Blender 3.4+ is about to expand! Follow these simple steps to get started:
Prerequisites:
Before installing SCIFI FLEX v2, ensure that you have Blender 3.4 or later installed on your computer. If you need to update or install Blender, visit the official Blender Foundation website at blender.org.
Step-by-Step Installation: {#step-by-step-installation:}
Download the Addon: {#download-the-addon:}
Locate the SCIFI FLEX v2 addon file, which should be a .zip file. This can typically be found in the purchase confirmation email or the downloads section of the website where you acquired SCIFI FLEX v2.
Open Blender
Launch Blender and open a new or existing project.
Access Preferences
Navigate to Edit > Preferences. A new window will pop up.
Click on the Add-ons tab within the Preferences window.
Install the Addon
In the Add-ons section, you’ll find an Install… button at the top. Click on this button.
A file browser will appear. Use it to navigate to the location of your downloaded SCIFI FLEX v2.zip file.
Select the .zip file and click Install Add-on from the file browser.
Enable the Addon
After installation, a new entry for SCIFI FLEX v2 will appear in the Add-ons list.
Find SCIFI FLEX v2 in the list and check the box next to it to enable the addon.
Once the checkbox is ticked, SCIFI FLEX v2 is active and ready for use.
Save Preferences
To ensure SCIFI FLEX v2 loads in every new Blender session, click on Save Preferences before closing the Preferences window.
Post-Installation {#post-installation}
After installation, it’s a good practice to restart Blender.
You can find SCIFI FLEX v2 in the Sidebar panel within the 3D Viewport. Press N if the Sidebar is not visible.
Troubleshooting {#troubleshooting}
If SCIFI FLEX v2 does not appear in the Add-ons list after installation, ensure that the .zip file was not accidentally unzipped.
For any issues related to Blender compatibility, refer to the Troubleshooting section of this manual.
Need Help? {#need-help?}
If you encounter any issues or have questions during the installation process, feel free to reach out to our support team at http://cw1.me/discord
By following these instructions, you should have SCIFI FLEX v2 installed and ready to enhance your Blender projects. Enjoy your journey into advanced displacement mapping and geometry generation!
SCIFI FLEX vs SPOCK? {#scifi-flex-vs-spock?}
As you begin to explore the capabilities of SCIFI FLEX v2, it’s helpful to understand how it stands out from other offerings in the realm of 3D modeling tools. This comparison aims to delineate the features and advantages of SCIFI FLEX v2 in relation to SIMPLE SCIFI FREE and SPOCK.
SIMPLE SCIFI FREE vs. SCIFI FLEX v2 {#simple-scifi-free-vs.-scifi-flex-v2}
SIMPLE SCIFI FREE {#simple-scifi-free}
- A standalone .blend file designed for ease of use.
- Generates 32-bit grayscale displacement maps and color texture maps.
- Utilizes Blender geometry to populate Geometry Node generators.
- Capable of creating scenes with real geometry for import into new projects.
- Operates primarily on a square plane.
SCIFI FLEX v2 {#scifi-flex-v2}
- An advanced addon that incorporates all functionalities of SIMPLE SCIFI FREE and more.
- Offers additional generators and allows application on selected faces of Blender objects.
- Creates both displacement maps and complex geometries.
- Not intended to be used within the SIMPLE SCIFI .blend file.
- Enables a more sophisticated shader control for material instances.
SCIFI FLEX v2 vs. SPOCK {#scifi-flex-v2-vs.-spock}
While SCIFI FLEX v2 and SPOCK may appear similar at a glance, their distinct features cater to different aspects of 3D modeling:
SCIFI FLEX v2 is tailored for artists who need to generate detailed displacement maps rapidly and apply them to existing geometries within Blender.
SPOCK excels in object generation speed and offers a different set of tools and functionalities that may be more suited to certain project requirements.
| SIMPLE SCIFI FREE | SCIFI FLEX v2 | SPOCK | |
|---|---|---|---|
| Displacement Map Generation | X | X | |
| Fastest at object generation | X | X | |
| Works with provided or user created DPACKS | X | X | |
| Using Geometry Nodes to create with | X | X | |
| Multiple python packing algorithms provides more control over population | X | ||
| Easy to use | X | X | |
| Advanced Control over Packing Density | X | ||
| Can populate ONLY inside of selected face | X | ||
| Use KPACK materials for populations (no randomness) | X | X | |
| Use advanced automated material for randomness in populations | X | X | |
| Best for Sci Fi Cityscapes | X | ||
| Best for Sci Fi greeble generation | X | ||
| Can create non-intersecting instances | X |
Choosing the Right Tool {#choosing-the-right-tool}
When deciding which tool to use, consider the complexity of your project, the level of detail required, and your proficiency with Blender’s interface. SCIFI FLEX v2 is the go-to addon for those who need the additional power and flexibility beyond what SIMPLE SCIFI FREE offers, and for tasks where SPOCK’s functionalities do not align with the project goals.
By understanding these differences, you can make an informed decision about which tool will best suit your creative workflow and help you achieve your desired results in 3D modeling.
Glossary of Key Terms {#glossary-of-key-terms}
Dive into the world of SCIFI FLEX v2 with a clear understanding of the terms you’ll encounter. This glossary defines essential concepts that are foundational for using the addon effectively.
Generators {#generators}
The powerhouse behind SCIFI FLEX v2, these geometry nodes are used to generate a variety of object distributions and patterns. They can be broadly categorized into three types:
-
 Geometry (geo): These different generators are responsible for creating and manipulating mesh-based forms and objects within Blender.
 -
 Texture (tex): These different generators focus on generating texture maps, which are essential for adding surface detail to your 3D models without altering their structure.
 -
 Displacement (dis): Specialized generators that create displacement maps, allowing for the simulation of complex geometries by modifying the surface of a simpler mesh.
DPACK: {#dpack:}
A .blend file with collections of predefined settings and objects that are used by the Generators to build complex objects. .DPACKS serve as templates that can be used to quickly achieve specific visual effects or textures on your models. Many DPACKS come with Flex. You can use existing DPACKS (see http://cw1.me/dpacks) or use ones created by others. You can create your own DPACKS as well. More information below.
Workflow {#workflow}
The sequence of steps or processes through which you create, modify, and finalize your 3D models using SCIFI FLEX v2. It encompasses everything from initial concept to the final export of the model, ensuring a smooth and efficient creative process.
Meshes {#meshes}
The collection of vertices, edges, and faces that defines the shape of a 3D object in Blender. SCIFI FLEX v2 can generate complex meshes procedurally using its advanced geometry nodes.
Instancing {#instancing}
A method used within SCIFI FLEX v2 to efficiently replicate objects without consuming additional memory, which is crucial for creating complex scenes with a high level of detail.
Propagation {#propagation}
The process by which SCIFI FLEX v2 distributes instances of objects across a surface, based on the parameters set within the geometry nodes.
By familiarizing yourself with these terms, you’ll be better equipped to navigate SCIFI FLEX v2 and utilize its full potential in your 3D projects.
Displacement {#displacement}
The process by which Blender creates complex geometry using only an image map (called a displacement map). Blender moves vertices in a mesh either up or down based on the grayscale value of the pixel in the displacement map. See below for more information. FLEX creates complex Displacement maps for this use.
By familiarizing yourself with these terms, you’ll be better equipped to navigate SCIFI FLEX v2 and utilize its full potential in your 3D projects.
Basic Workflow {#basic-workflow}
Here’s basically how it works. First you select the DPACK you want to use, then you apply a generator and then once displayed in Blender, you tweak the generator settings in the modifier panel for the newly generated FLEX object.
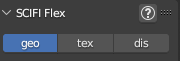
The Interface {#the-interface}
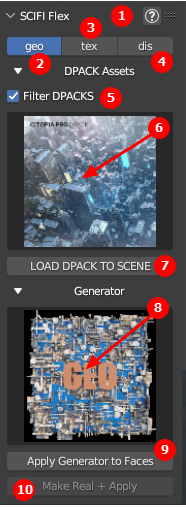
- Help button takes you to these docs
- Geo tab for creating geometry
- Tex tab for creating texture maps
- Dis tab for creating displacement maps
- Filter DPACK switch shows most compatible DPACKS for this type of generators. Different DPACKS work best with either geo, tex or dis.
- DPACK chooser: click to select DPACK
- LOAD DPACK TO SCENE button. Adds the DPACK collections to your existing scene.
- Generator chooser: click to choose which generator you want to use
- Apply Generator to Faces button: Applies the selected generator to the selected faces. If the selected DPACK is not loaded, FLEX will also load the DPACK as well.
- Make Real + Apply button. This will convert your highly efficient geometry nodes instances to a single object. Warning, this will use more memory than keeping everything as Geometry Nodes.
Each Generator can have a different workflow associated with it. Please refer to below instructions on how to use the generators in your workflow.
Overview of Generators {#overview-of-generators}
There are many different DPACKS and Generators. Typically, DPACKS are created for specific Generator categories. These categories are represented by the three tabs at the top of the interface. They are Geometry (geo), Texture (tex) and Displacement (dis).
Within each generator category are one or more Generators.
They can be broadly categorized into three types:
-
Geometry (geo): These different generators are responsible for creating and manipulating mesh-based forms and objects within Blender.
-
Texture (tex): These different generators focus on generating texture maps, which are essential for adding surface detail to your 3D models without altering their structure.
-
Displacement (dis): Specialized generators that create displacement maps, allowing for the simulation of complex geometries by modifying the surface of a simpler mesh.
The Geo Generators {#the-geo-generators}
Here are a list of the Geometry Generators. Geometry generators are for 3D Environment details that work well for large environments at scale or extreme details.
Geo Gen {#geo-gen}
- Focused on specific 3D geometries, Geo-Gen does not use non-proportional scaling.
- Objects can display multiple colors through vertex color mapping, enhancing the variety in your designs.
- When rendering color layers, vertex colors are utilized to generate the diffuse map. In displacement mode, cw-gen-z-depth is automatically applied as the material, with cw-gen-color used for diffuse color overrides.
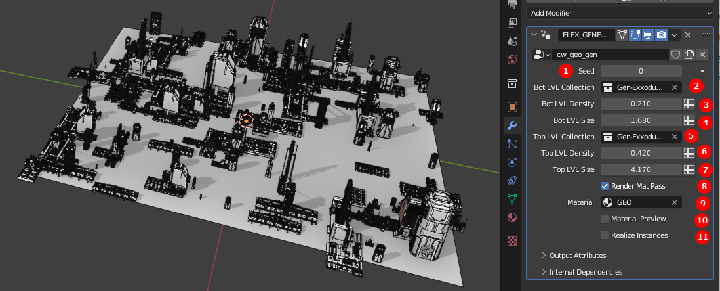
- Random Seed
- Bottom Level Collection
- Bottom Level Density
- Bottom Level Size
- Top Level Collection
- Top Level Density
- Top Level Size
- Render Mat Pass (leave on– there for legacy)
- Material to be used (typically use the default)
- Material Preview: turn on to see the default material. Off to see vert colors.
- Realize Instance (makes things VERY slow)
Panel Gen {#panel-gen}
- Very similar to Geo Gen but uses a more random grid spacing for placement of instances. Otherwise, the same as Geo Gen.
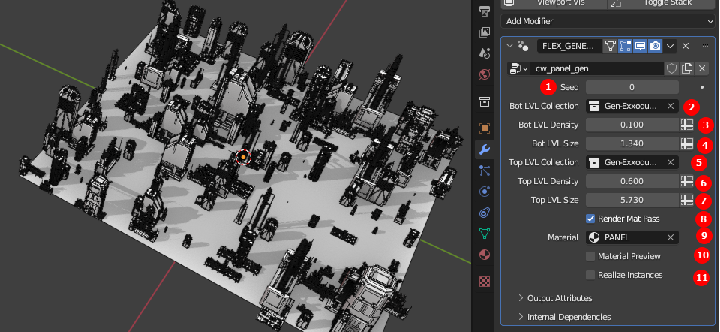
- Random Seed
- Bottom Level Collection
- Bottom Level Density
- Bottom Level Size
- Top Level Collection
- Top Level Density
- Top Level Size
- Render Mat Pass (leave on– there for legacy)
- Material to be used (typically use the default)
- Material Preview: turn on to see the default material. Off to see vert colors.
- Realize Instance (makes things VERY slow)
Mesh Gen {#mesh-gen}
- This generator will populate both top and bottom collection instances on a grid as defined by the vertices in the mesh.
- You can use the subdivide control to add more vertices. Use on a plane and up the subdivision to get an evenly spaced grid of instances.
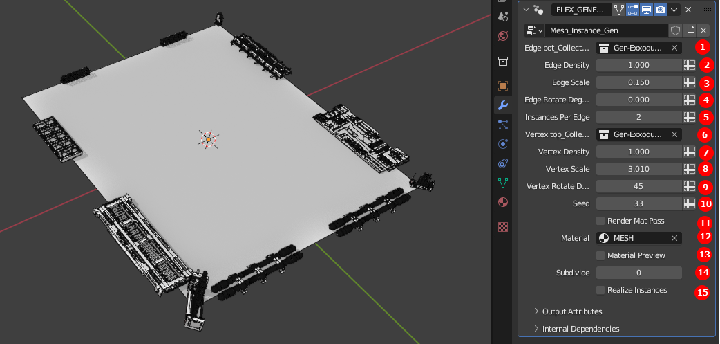
This generator is used to place DPACK object instances on the edge and vertex boundaries of the selected faces. Also has Subdivide setting to allow for adding extra edges and vertices.
- Edge object collection
- Edge object density
- Edge object scale
- Edge object rotate
- Number of instances per edge
- Vertex object collection
- Vertex object density
- Vertex object scale
- Vertex object rotate
- Random Seed value
- Render Mat Pass (leave as default)
- Material (leave as default)
- Material preview (used the Material above for viewing). When off good for checking vertex colors which are used for advanced materials.
- Subdivision settings (default is 0 for only edges)
- Realize Instance (makes things VERY slow)
The Tex Generators {#the-tex-generators}
Tex Generators are for creating 2D textures that are used in materials
Dots-Gen {#dots-gen}
- Specializing in randomized dots, this generator is perfect for creating lighting and emissive effects.
- Like Shapes Gen, it works with proportional and non-proportional 2D shapes from a selected DPACK. Each 2D shape is given the cw-dots-2D material. For diffuse color overrides, cw-dots-color is used
The Dis Generators {#the-dis-generators}
Dis generators are used to create 2d displacement maps
Shapes Gen {#shapes-gen}
- This generator utilizes a mix of proportional and non-proportional 2D and 3D shapes from your chosen DPACK.
- Proportional shapes maintain equal scaling in the X and Y axes, while non-proportional shapes offer distinct scaling in these directions.
- For materials, 2D shapes are assigned cw-shapes-2D and 3D shapes get cw-shapes-3D. These materials are crucial when rendering for displacement. The cw-shapes-color material is used for diffuse color overrides.
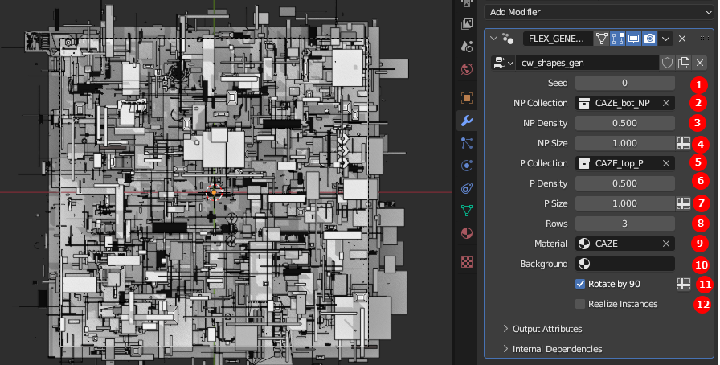
- Random Seed
- Non Proportional (NP) Collection (X and Y scaled independently)
- NP Density
- NP Size
- Propportial (P) Collection (X and Y scaled the same)
- P Density
- P Size
- Material to be used (typically use the default)
- Background color (white, gray or black is best)
- Randomly Rotate by 90 degrees. Turn this OFF if you are using hieroglyphs or orientation sensitive collections
- Subdivision amount for the selected faces
- Realize Instance (makes things VERY slow)
Grid Gen {#grid-gen}
- This generator will populate both top and bottom collection instances on a grid as defined by the vertices in the mesh.
- You can use the subdivide control to add more vertices. Use on a plane and up the subdivision to get an evenly spaced grid of instances.
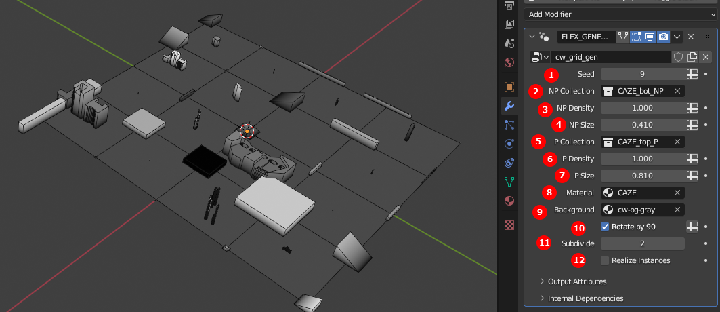
- Random Seed
- Non Proportional (NP) Collection (X and Y scaled independently)
- NP Density
- NP Size
- Propportial (P) Collection (X and Y scaled the same)
- P Density
- P Size
- Material to be used (typically use the default)
- Background color (white, gray or black is best)
- Randomly Rotate by 90 degrees. Turn this OFF if you are using hieroglyphs or orientation sensitive collections
- Subdivision amount for the selected faces
- Realize Instance (makes things VERY slow)
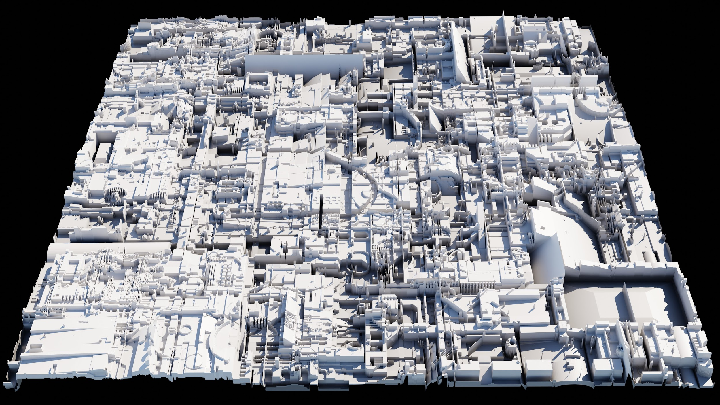
Understanding Displacement in 3D Modeling and FLEX {#understanding-displacement-in-3d-modeling-and-flex}
Displacement is a transformative feature in 3D modeling that enables artists to add intricate detail to their models without the need for complex geometry. It’s akin to a magic trick; one that allows the surface of a model to appear highly detailed for close-up shots without the detailed polygon modeling typically required. Let’s break down how displacement works within SCIFI FLEX v2 and Blender.
The Basics of Displacement: {#the-basics-of-displacement:}
Displacement alters the position of vertices in a mesh based on grayscale information from a texture. In this grayscale image, white areas represent the highest points, black the lowest, and varying shades of gray the levels in between. For instance, the image shown below

creates this 3D model when used as a displacement map.
Overview of working with Displacement in SCIFI FLEX v2: {#overview-of-working-with-displacement-in-scifi-flex-v2:}
Start with a model that has a good topology and enough geometry to support displacement. A dense mesh or a subdivision surface modifier can be used to increase the mesh resolution.
Displacement Map Generation: {#displacement-map-generation:}
Utilize SCIFI FLEX v2 to generate a displacement map. (See below) These maps can be created using the addon’s generators, specifically designed for displacement (dis generators).
Choose a DPACK that aligns with your creative goals, or customize the settings to create a unique displacement map.
Applying a Displacement Map in Blender: {#applying-a-displacement-map-in-blender:}
For details on how to do this, please see: http://cw1.me/displacement
In Blender, the displacement map can be applied using the Displacement Modifier or through the material shader nodes for finer control.
Connect the displacement map to the corresponding nodes and adjust the scale to control the intensity of the displacement effect.
Fine-Tuning {#fine-tuning}
Adjust the mid-level and strength of the displacement to get the right amount of detail. It’s crucial to find a balance between detail and the overall shape of the model.
Real-time preview adjustments can be made using Blender’s sculpting tools for a more hands-on approach to fine-tuning.
Rendering Considerations {#rendering-considerations}
For rendering, ensure that the renderer is set to utilize the displacement information properly. Cycles renderer, for instance, has settings for both ‘Displacement Only’ and ‘Displacement and Bump’ which can be selected based on the desired outcome.
Optimization:
Displacement can be heavy on resources. Use Blender’s level of detail (LOD) system (modifier setting) or adaptive subdivision to optimize the scene, ensuring that the displacement detail is higher where needed and lower where it isn’t.
Step-by-Step Guide: Using the Displacement Feature in SCIFI FLEX v2 {#step-by-step-guide:-using-the-displacement-feature-in-scifi-flex-v2}
Creating displacement maps in SCIFI FLEX v2 is a straightforward process that enhances the detail and realism of your 3D models. Follow this step-by-step guide to master the displacement feature from start to finish.

DPACKS (on top) GENERATOR (on bottom) {#dpacks-(on-top)-generator-(on-bottom)}
Step 1: Select the Displacement Tab {#step-1:-select-the-displacement-tab}
- Open Blender and ensure SCIFI FLEX v2 is enabled.
- In the SCIFI FLEX v2 interface using the N tab, locate and select the ‘Displacement’ (Dis) tab. This is your control center for creating displacement maps.
Step 2: Choose Your Base Geometry {#step-2:-choose-your-base-geometry}
- Once the dis tab is selected, FLEX will enter into a new scene mode allowing you to continue working to create your displacement map.
Step 3: Choose a DPACK {#step-3:-choose-a-dpack}
- You will use a pre-made displacement pack (DPACK), you can select it from the provided thumbnail preview. These are specifically designed for displacement.
- Applying a DPACK will load a set of predefined collections of objects that will create a certain displacement style or pattern.
- The Filter control, when checked, displays the best DPACKS for displacement. When unchecked you can use any DPACK, but your results may vary.
Step 4: Choose a Displacement Generator {#step-4:-choose-a-displacement-generator}
- Within the Dis tab, you will find different displacement generators. These are preset node groups designed to create specific displacement effects. They are specifically designed for displacement.
- Choose a generator that best suits the effect you are trying to achieve on your model.
Step 5: Customize the Generator Settings {#step-5:-customize-the-generator-settings}
- With your generator or DPACK selected, begin customizing the settings in the modifier of the object.
- Adjust the different scale, strength, and detail parameters unique to the generator you chose to modify how the displacement map will render.
Step 6: Preview the Effect {#step-6:-preview-the-effect}
- Use Blender’s viewport shading mode to get a real-time preview of how the displacement affects your mesh.
Step 7: Refine the Settings {#step-7:-refine-the-settings}
- Based on the preview, go back and tweak the generator settings as needed to refine the look of your displacement.
- Pay special attention to details such as the density and the resolution of the displacement to ensure they match your artistic vision.
Step 8: Generate the Displacement Map {#step-8:-generate-the-displacement-map}
- Once you are satisfied with the settings, use the ‘RENDER SCENE’ button within the Dis tab. Be sure and set the correct resolution you want your scene rendered at.
- SCIFI FLEX v2 will process the information and render a displacement map that can be applied to your mesh.
- Save the map however you like. It is recommended that you save in EXIF 16-bit or 32-bit format as this will provide much higher results for displacement.
Step 9: Apply the Displacement Map to the Mesh {#step-9:-apply-the-displacement-map-to-the-mesh}
- After generating the map, apply it to your mesh using the above mentioned techniques (as found at: http://cw1.me/displacement )
By following these steps, you will be able to utilize the powerful displacement feature in SCIFI FLEX v2, adding complexity and realism to your 3D models with ease.
Creating texture maps in SCIFI FLEX v2 {#creating-texture-maps-in-scifi-flex-v2}
Using the tex tab, you can create texture maps as well. These maps are typically used as light patterns for cities, but you can choose non-filtered DPACKS to get different results as well.
To create these maps you use the exact same process as if you were creating displacement maps. The only difference is you’ll probably want to save them as 8-bit PNG files as EXIF files are larger and consume more memory without giving you much if any different final rendered effect.
Creating Geometry in SCIFI FLEX v2 {#creating-geometry-in-scifi-flex-v2}
Geometry creation in SCIFI FLEX 2 is created with object instancing. Put objects into a bottom collection and top collection. Select these collections in the modifier created by the addon.
DPacks are pre-created collections intended to work well within a theme. You don;t have to use DPACKs. You can use and collections you have that contain single objects within them with no parents or children.
Geometry details are good for extreme scales. Whether it’s a large environment or intricate complexity. In both cases details are created quickly at scale that aren’t intended to have have too close of scrutiny, like circuits at a distance or a city in the background
Creating Custom DPACKS in SCIFI FLEX v2 {#creating-custom-dpacks-in-scifi-flex-v2}
Crafting a personalized Displacement Pack (DPACK) in SCIFI FLEX v2 enriches your 3D modeling experience, allowing you to infuse unique textures and patterns into your projects. This guide outlines the process for creating your own DPACK, detailing the functionalities of various generators.
Anatomy of a DPACK {#anatomy-of-a-dpack}
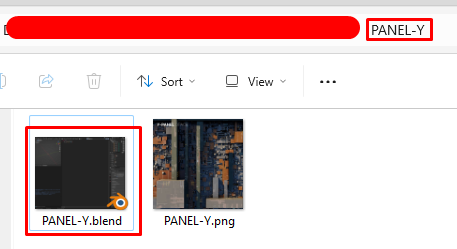
DPACKS are folders containing 2 files. One item is a .blend file and the other is a PNG thumbnail (any square resolution: recommended is 256x256 or greater not to exceed 1K). Both files and the folder need to be named the same. So in the case of the DPACK folder named PANEL-Y, inside you would find:

Naming convention for DPACKS {#naming-convention-for-dpacks}
As mentioned above, there are three types of Generators and they are Geometry (geo), Texture (tex) and Displacement (dis). When FLEX launches it will place each DPACK thumbnail in the associated tab. So, in order for the DPACK you are creating to be displayed in the correct tab, you need to name your DPACK (files and folder) using the following conventions:
- Prefix of TEX- if you intend for your DPACK to work with Texture Generators.
- Prefix of DIS- if you intend for your DPACK to work with Displacement Generators.
- No Prefix necessary if you want to work with Geometry Generators.
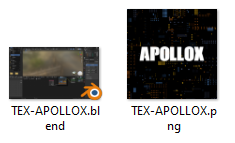
These Prefixes must also be applied to the files inside the DPACK folder. So, in the case of a DPACK named TEX-APPOLOX, the file names would be:
Anatomy of a DPACK .blend file {#anatomy-of-a-dpack-.blend-file}
Inside the DPACK blender file, there should be only two collections. The naming of the collections is important. Notice the naming of the collections in this PANEL-Y.blend DPACK file:
Here is the naming {#here-is-the-naming}

DPACK Materials {#dpack-materials}
If a material is included in the .blend file with the same name (without prefix) as the DPack it will be automatically applied. For example: If your DPACK is Awesome, or TEX-Awesome, or DIS-Awesome your material to include will simply be named “Awesome”. Including these materials will help re-create the intended look of the DPACK by default.
How to convert your instanced geometry to editable meshes {#how-to-convert-your-instanced-geometry-to-editable-meshes}
The basic way to do this is first make sure your Material Preview is set to 0 and Render Mat Pass is set to 1 as in the image below:

Geo Node modifier setting (also works with cw_geo_gen Geometry Nodes modifier)
Next, with the object selected, go into local mode and then Make Instances Real as shown below:

Must be in Object mode with the object selected
Then, you’ll have a ton of existing objects selected. Don’t deselect, as the easiest way to consolidate is to control click on the topmost selected object in the outline view to make it active and then Make Single User, Object and Data.
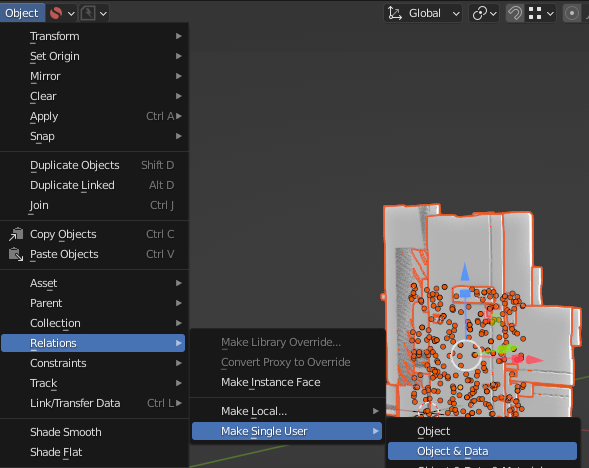
This allows you to be able to change the scale of all objects at once
Next, Apply the Scale and Rotation to all the selected objects

You can also press Ctrl + A
Then Join all the objects into one.
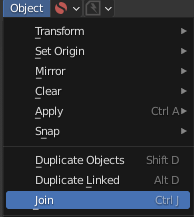
You can also press Ctrl + J
If you see smoothing errors, then be sure to turn on Auto Smooth and (if necessary) Clear Custom Normals as shown:
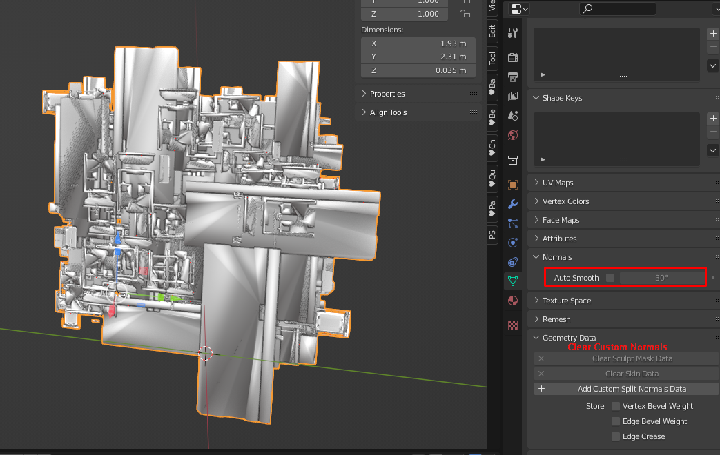
Fix smoothing artifacts and errors
Next, you’ll want to hide (or delete) the original object as the instances are in addition to it.
Be sure to add back the cw-gen-material material to the objects.
Exit local mode and you’re good to go!